How I Recreated a Real Race Car in iRacing
WISSOTA Street Stock · iRacing
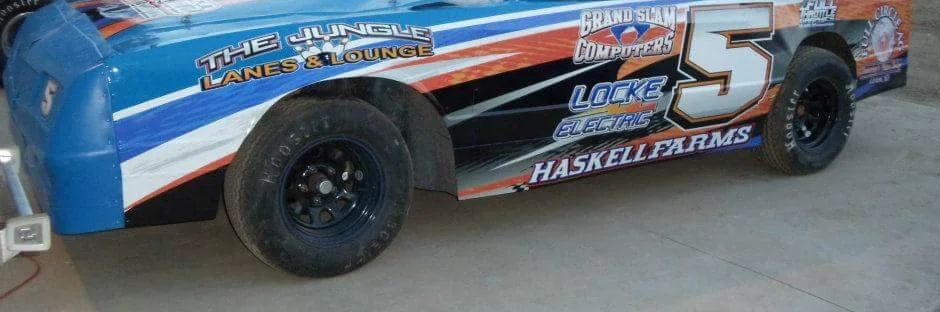
Lance Haskell's #5
Three of his street stocks, the 2012, 2011 and 2010 cars, rebuilt for the iRacing simulator.
Want to paint your own? Jump to the how to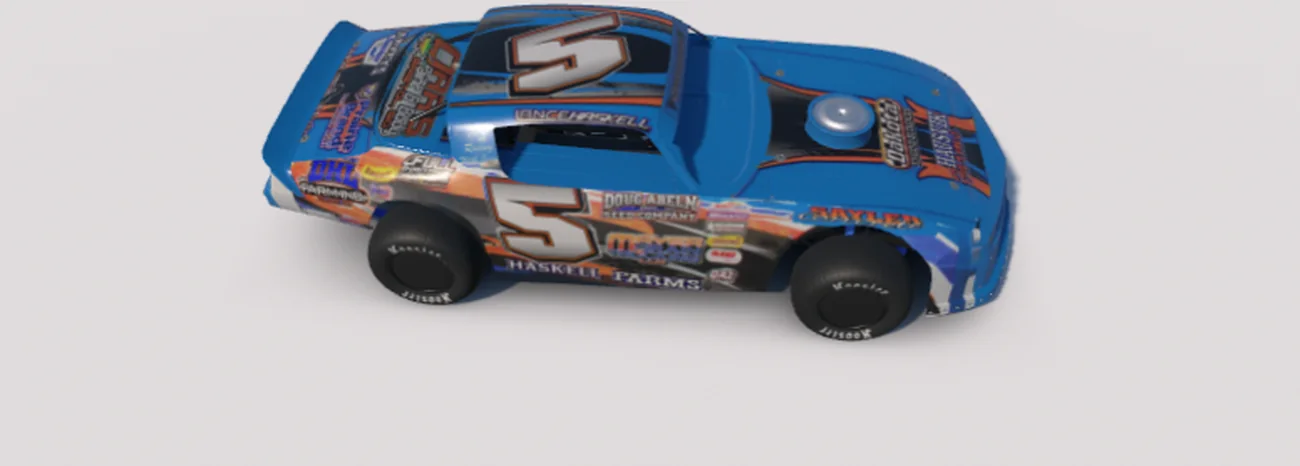
I made this for my cousin Lance. I'm getting into online racing with iRacing. When I saw that it lets you create your own skin, a custom paint job for your car, I wanted to try to recreate his race car.
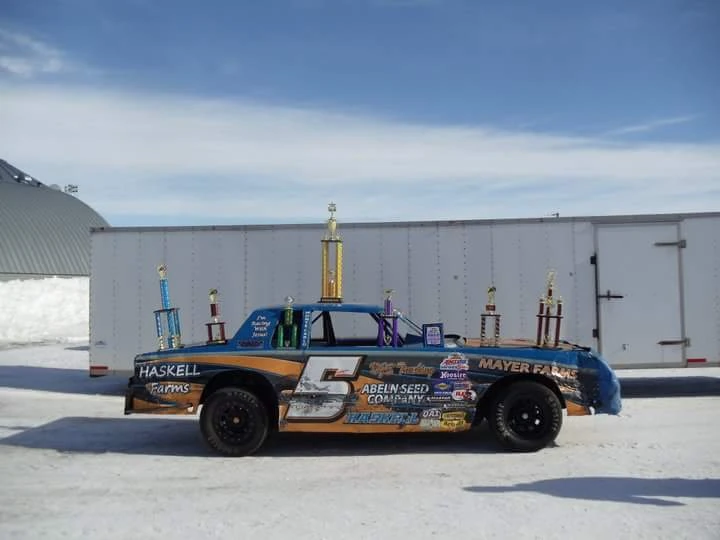
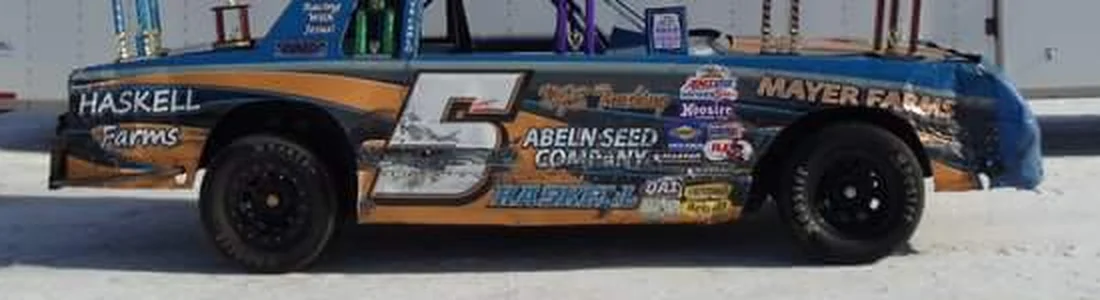
Lance raced WISSOTA Street Stocks. In 2010 he was the Brown County Speedway track champion and the South Dakota Street Stock state champion. I started with that championship car, and all I had was two photos: a thank you card and a picture of the car in the snow. Lance loved it and asked what software it took. Then the photos kept coming: his 2012 car, his 2011 car, and his design files for all three. Every new file made the cars sharper, and one car turned into three.
Here is how they turned out. If you want your own car in iRacing, part two shows the whole method: paint it yourself, step by step, or do what I did and have an AI helper do the painting while you tell it what looks off.
All three were matched to Lance's own photos and design files, sponsor by sponsor, so each one looks like his car and not just something close. The newest one is first.
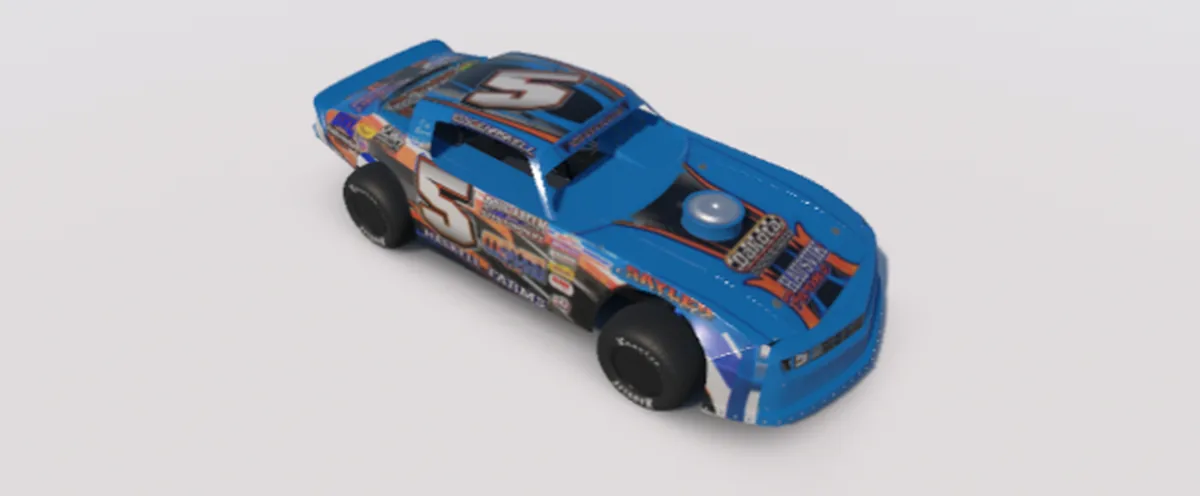
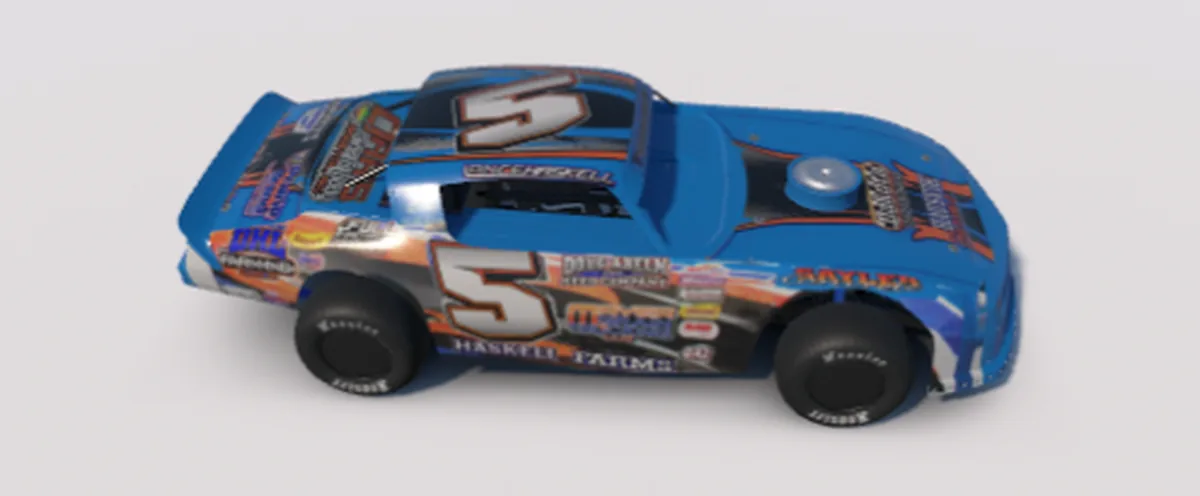
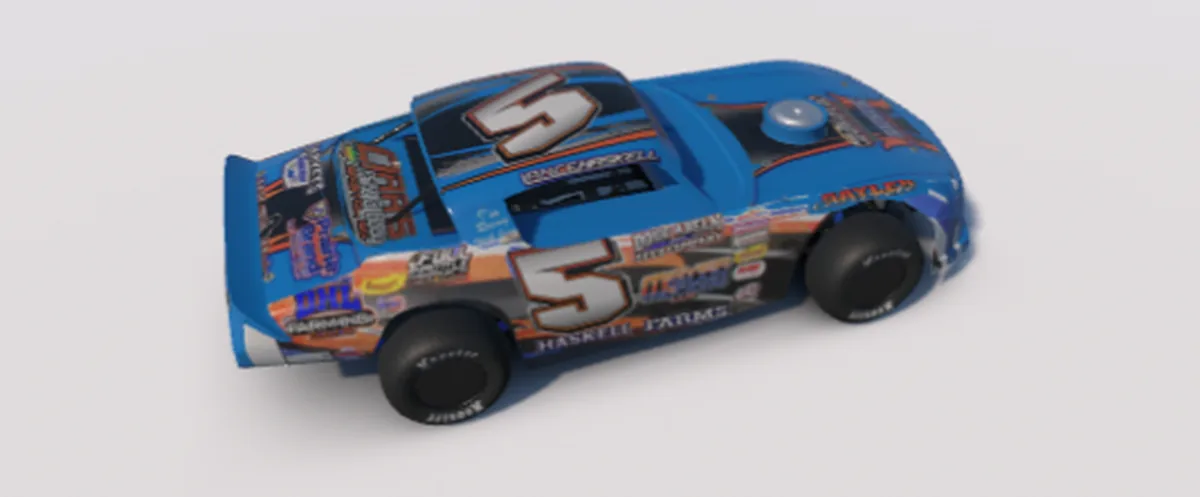
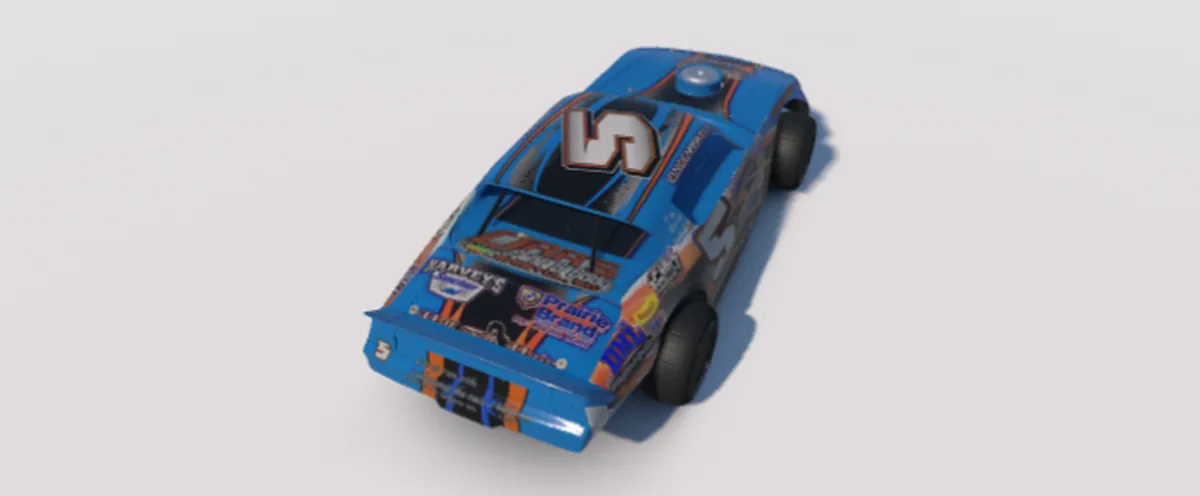
The 2012 car
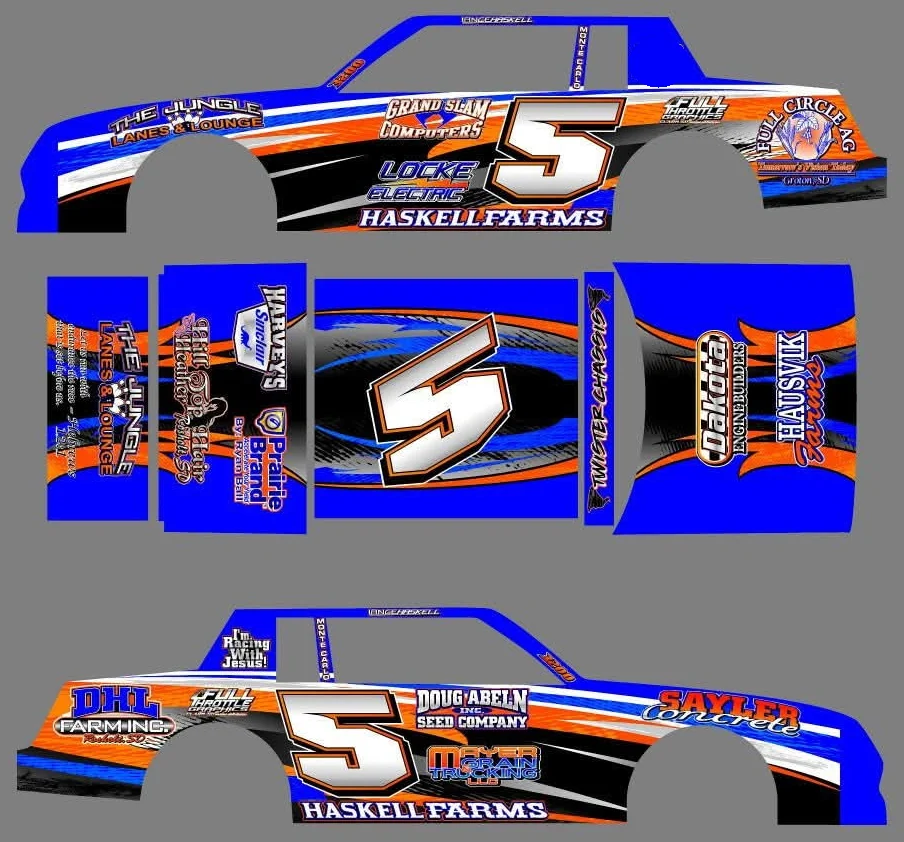
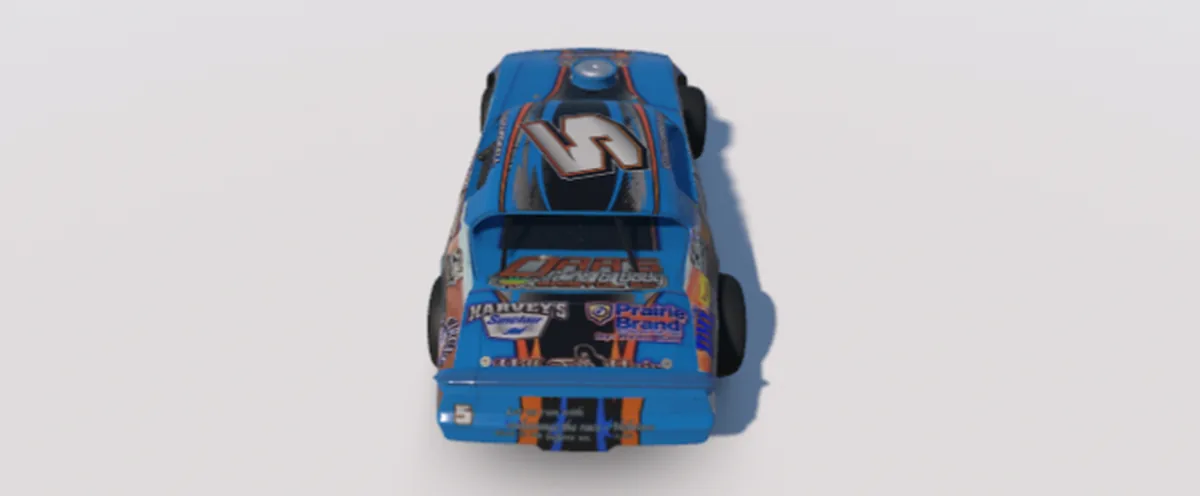
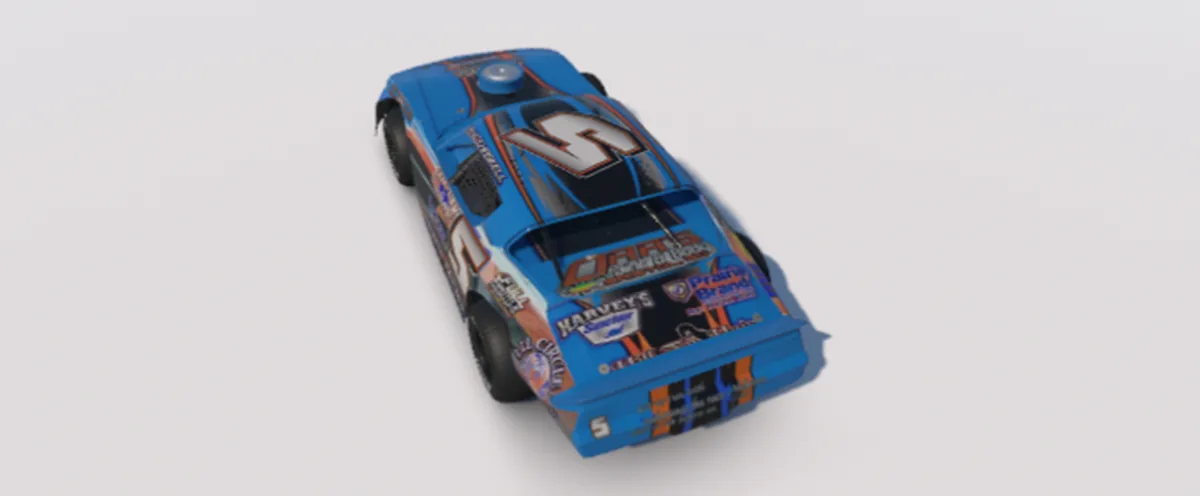
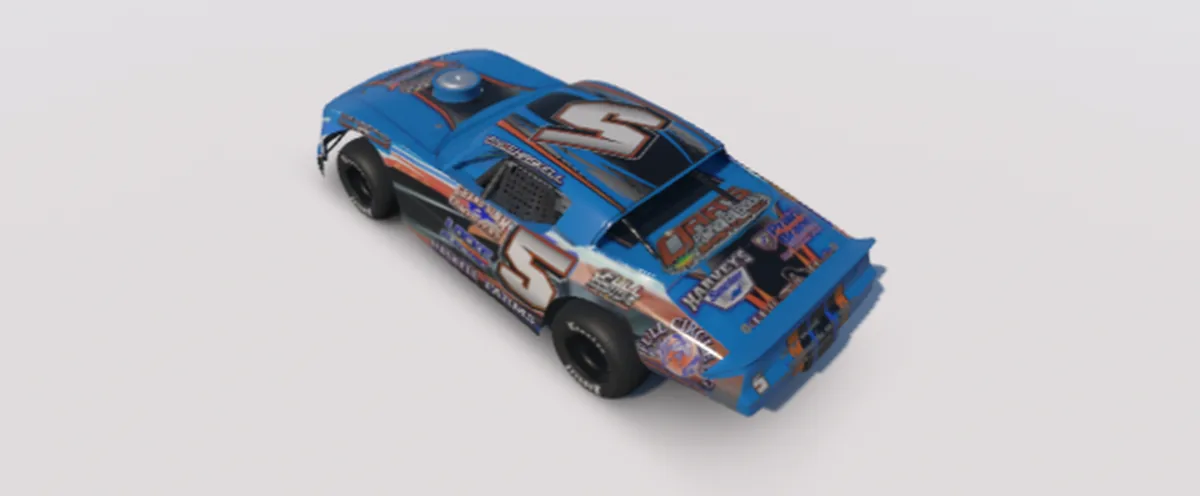
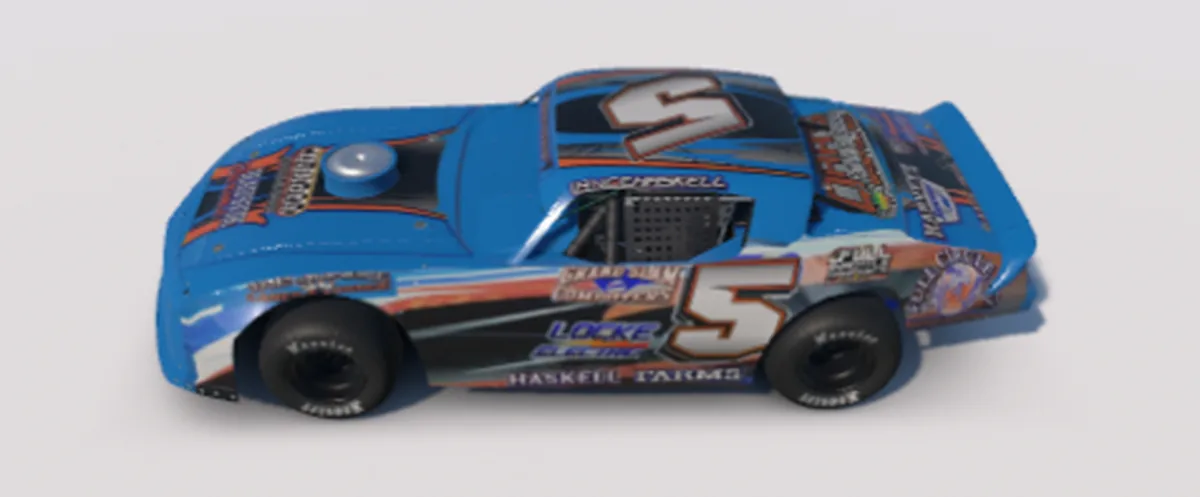
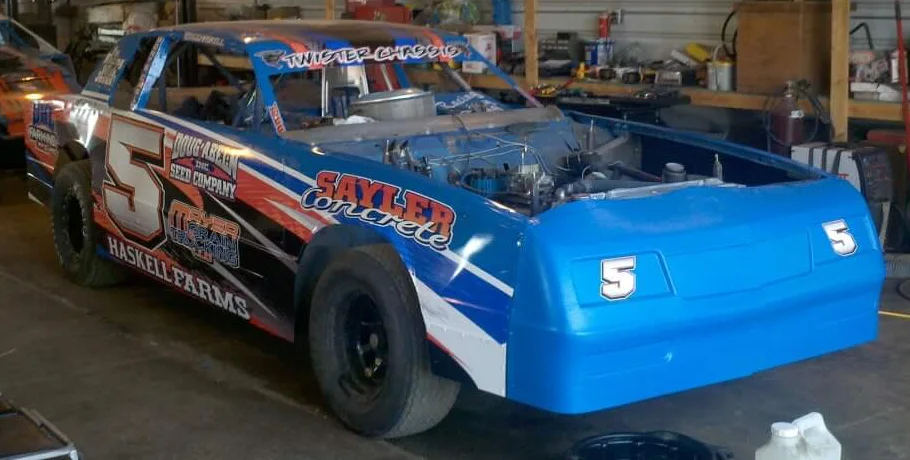
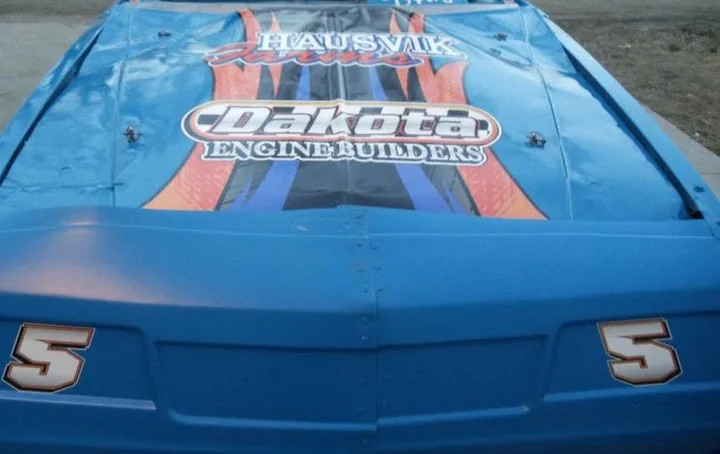
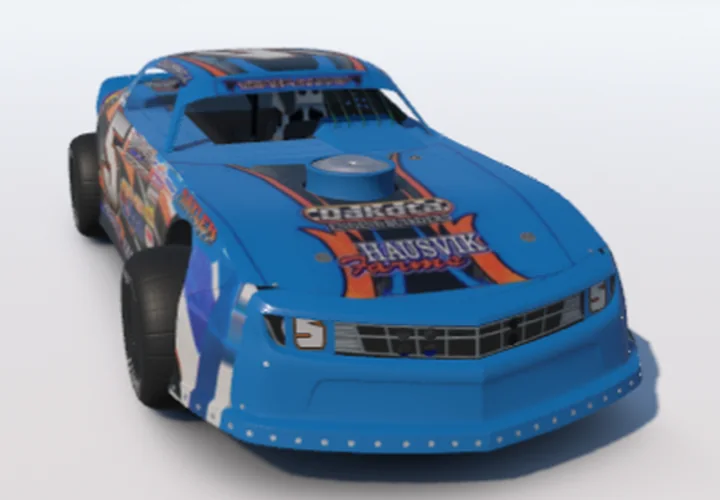
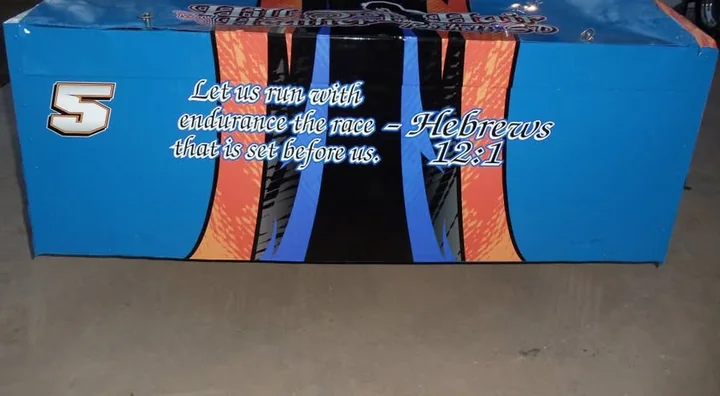
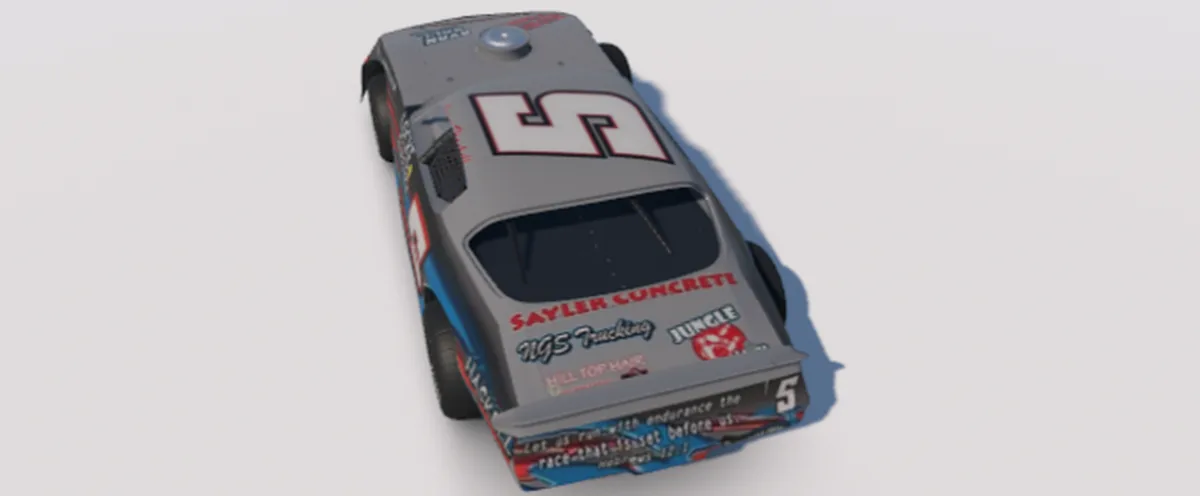
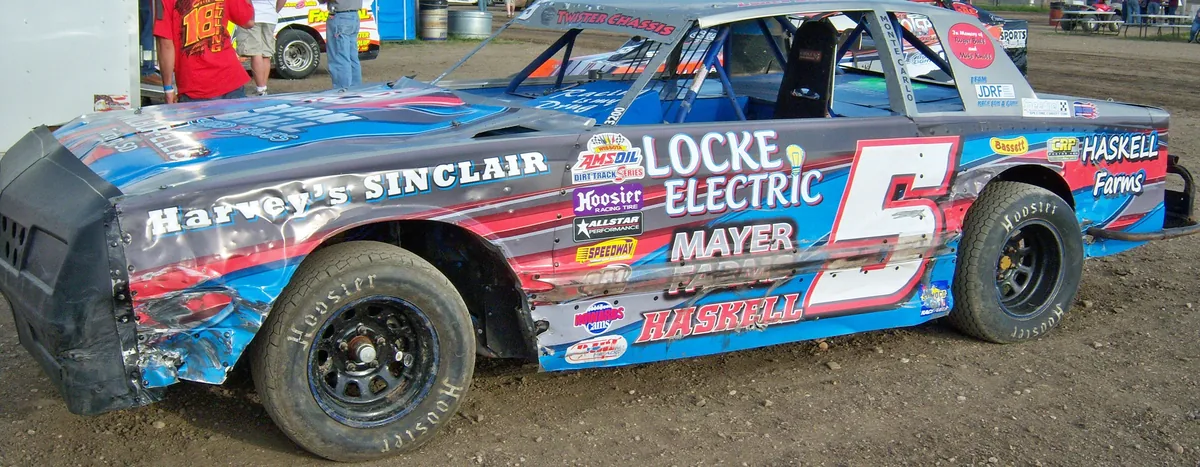
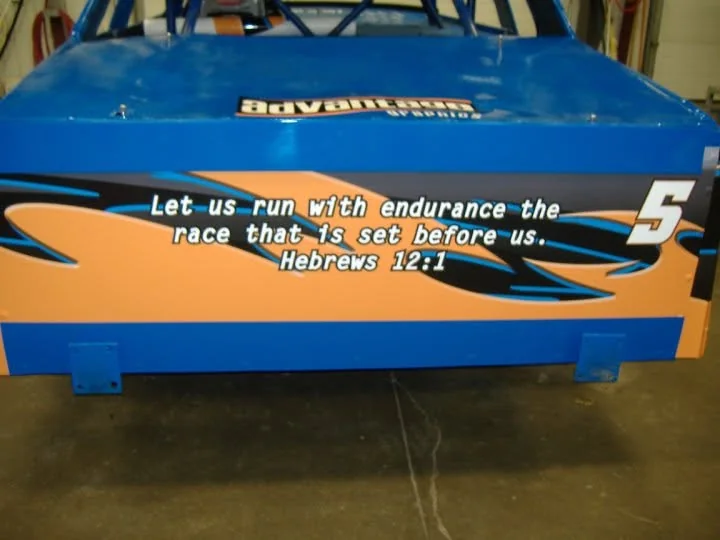
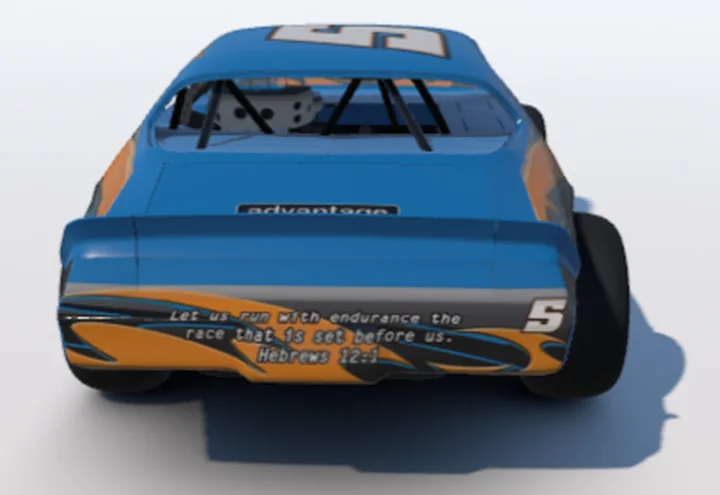
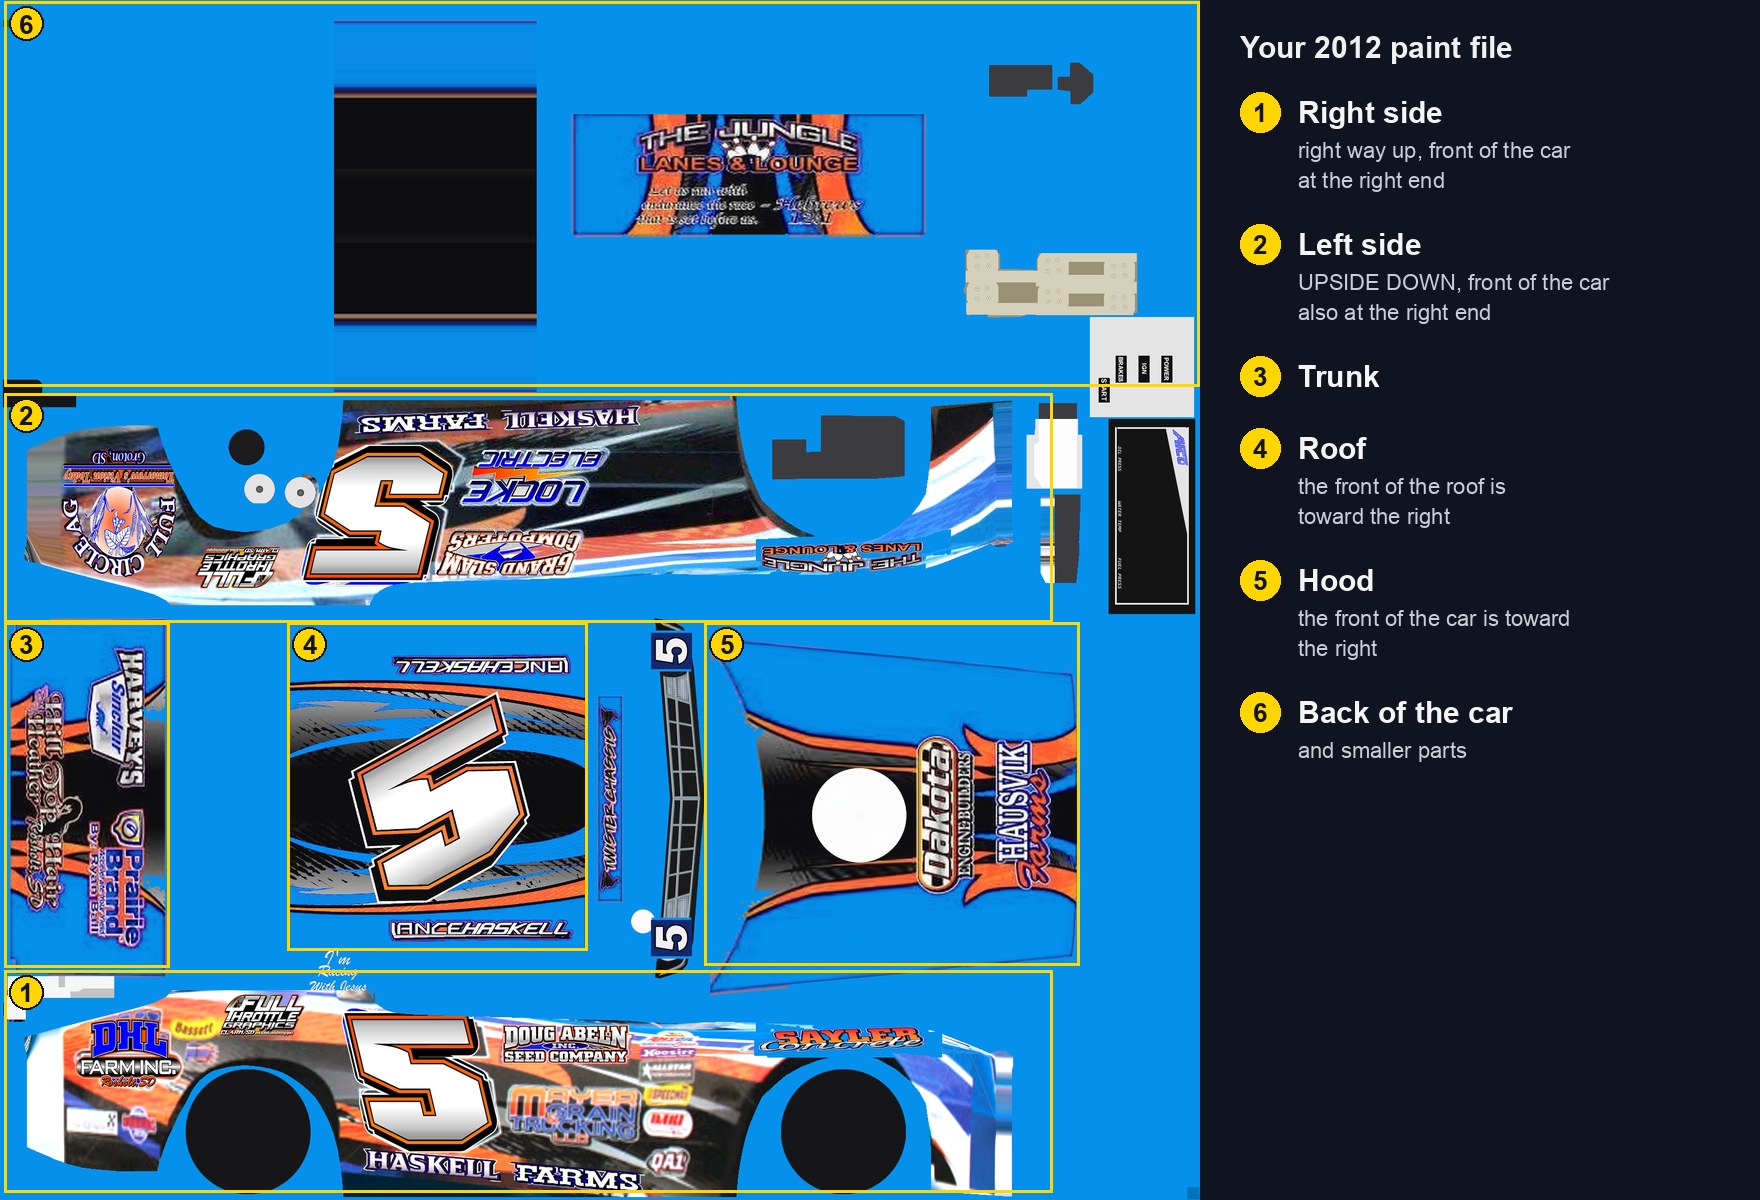
The 2012 car's roof, hood and trunk came straight from Lance's design file. The sides came from his 2012 photos, with every sponsor right where it was on the real car, and so did the back, the ORR'S sticker behind the roll cage and the 5 on each side of the nose.
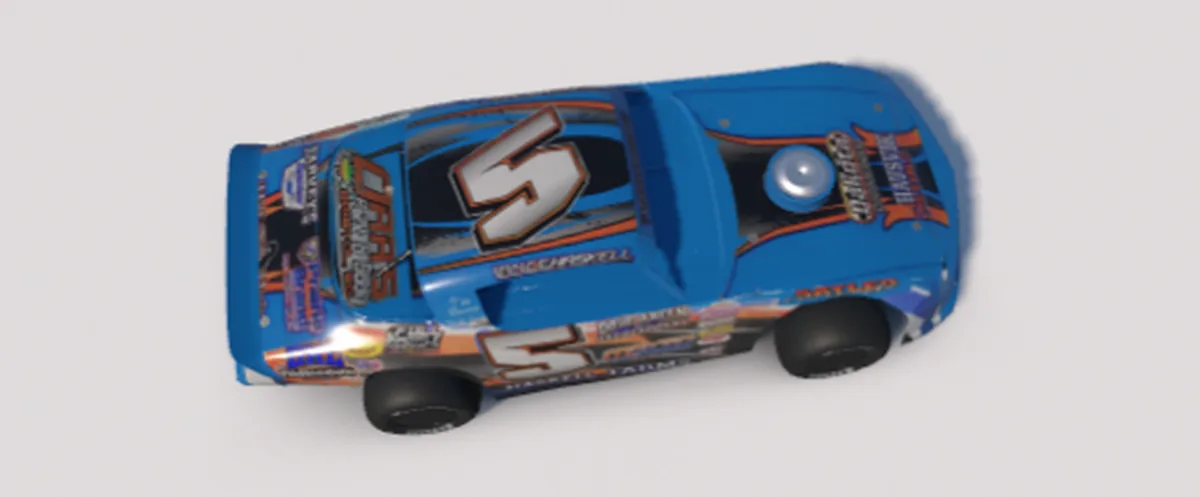
Then I took it for a drive: a Test Drive on the dirt at USA International Speedway in Lakeland, Florida.
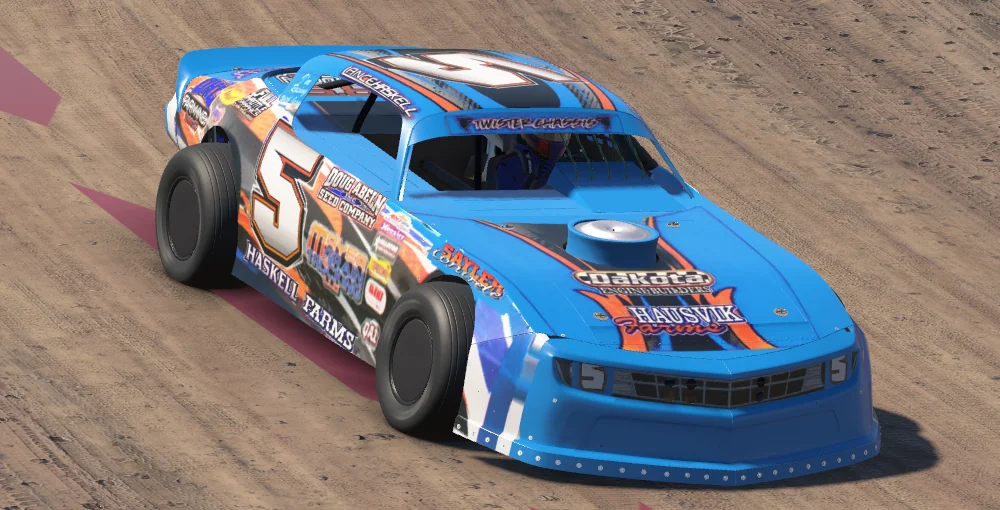
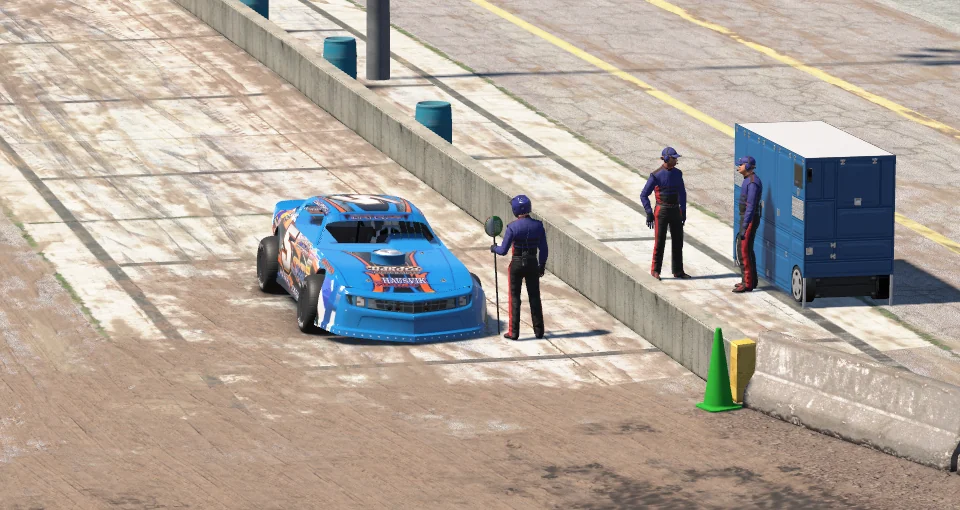
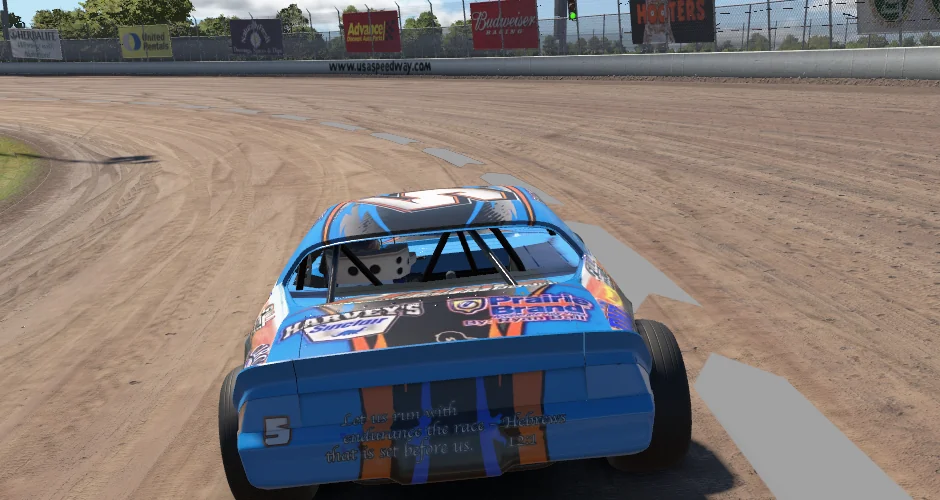
Every side
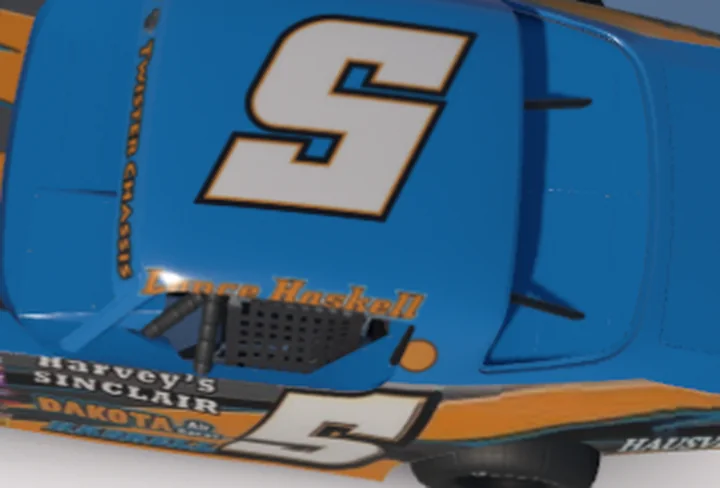
All the way around, from above, so the roof, the hood and the sides all show. Tap any picture to see it bigger.
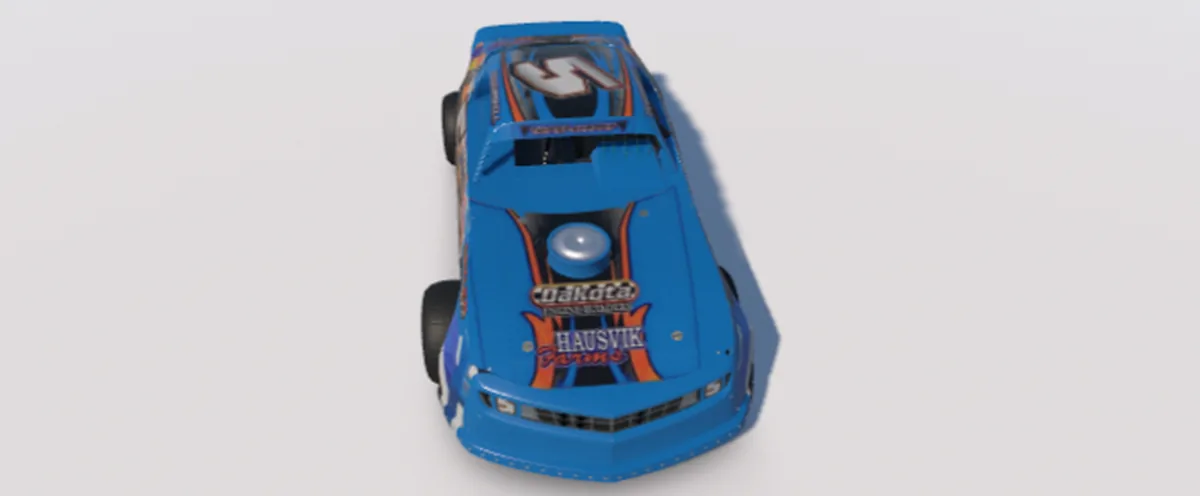
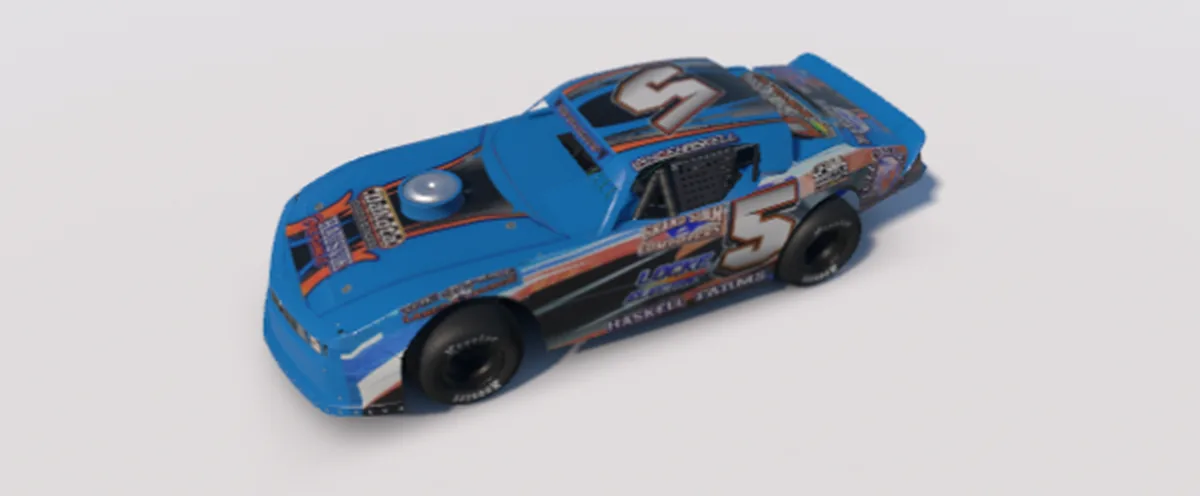
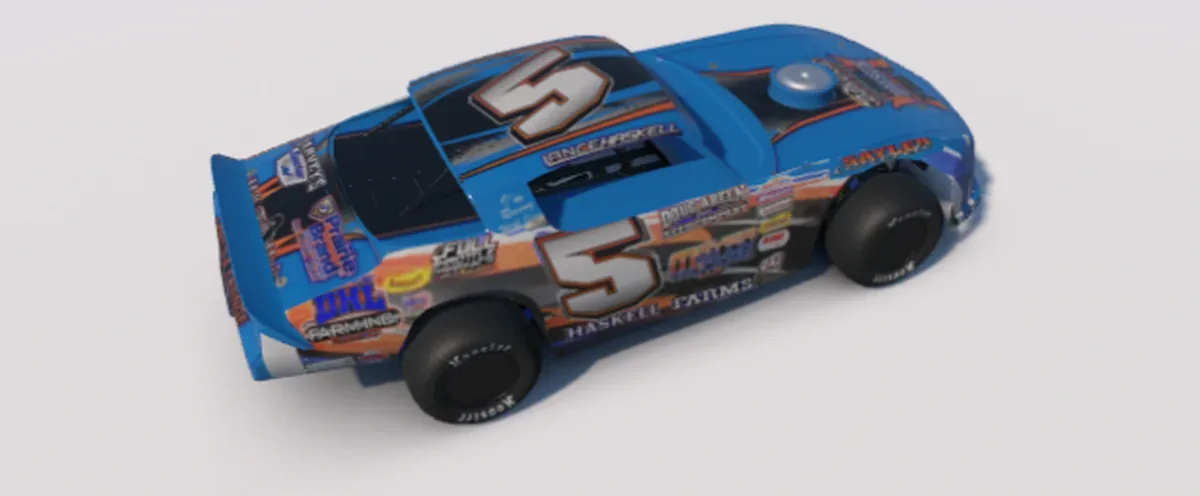
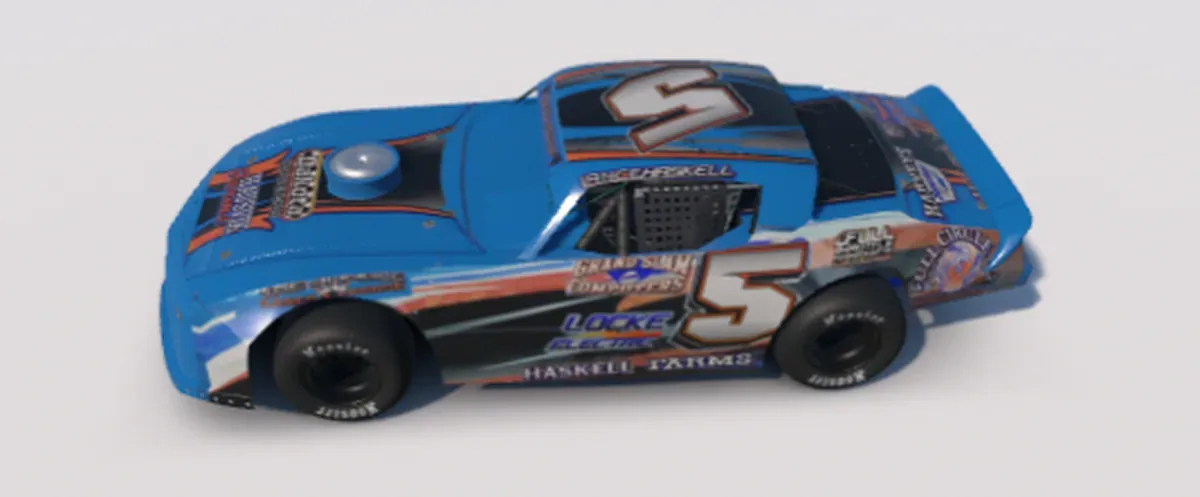
Then and now: 2012
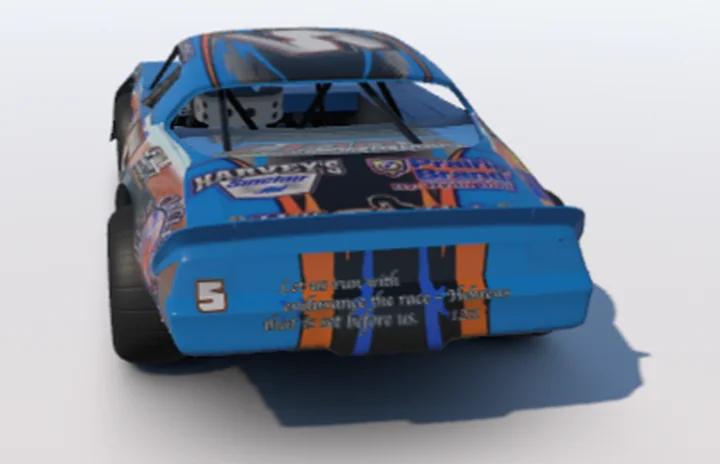
The 2011 car
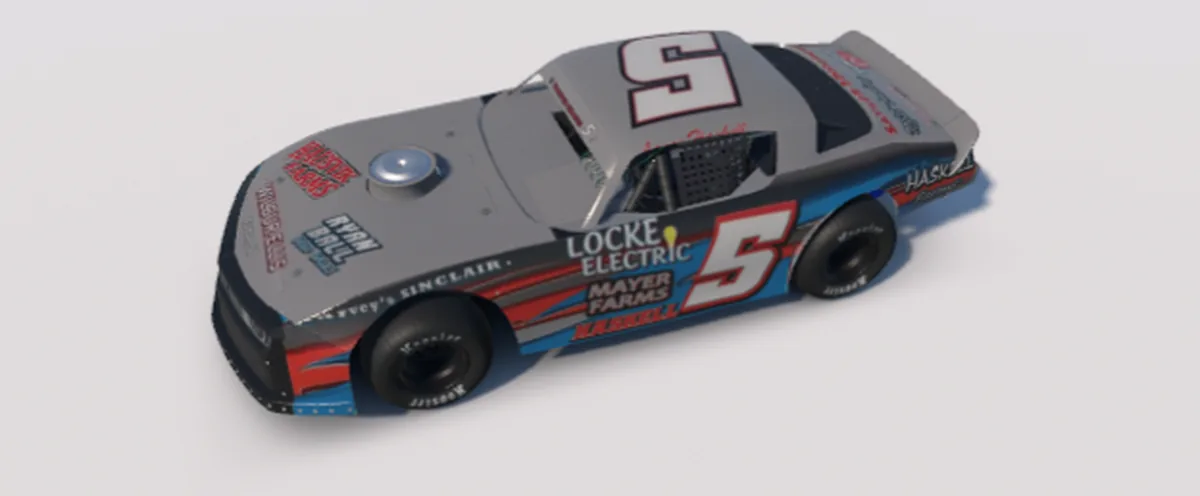
Gray, red and light blue. This one came straight from Lance's design files: both sides, the hood, the trunk, the back and the roof.
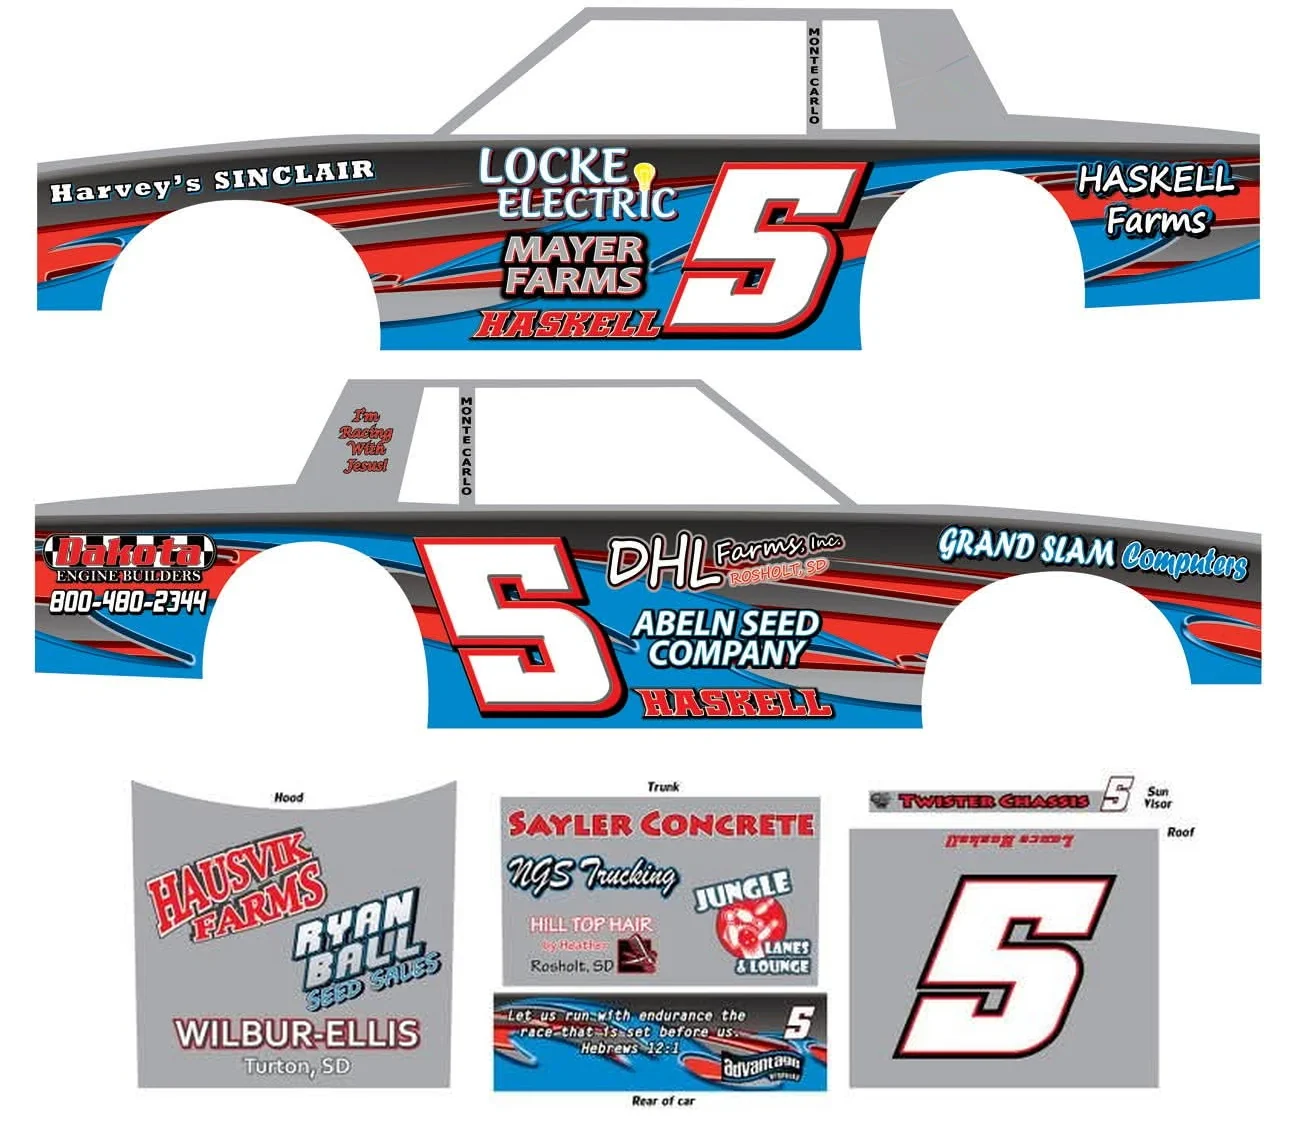
The 2010 car
- 2010 Brown County Speedway Track Champion
- 2010 South Dakota Street Stock State Champion
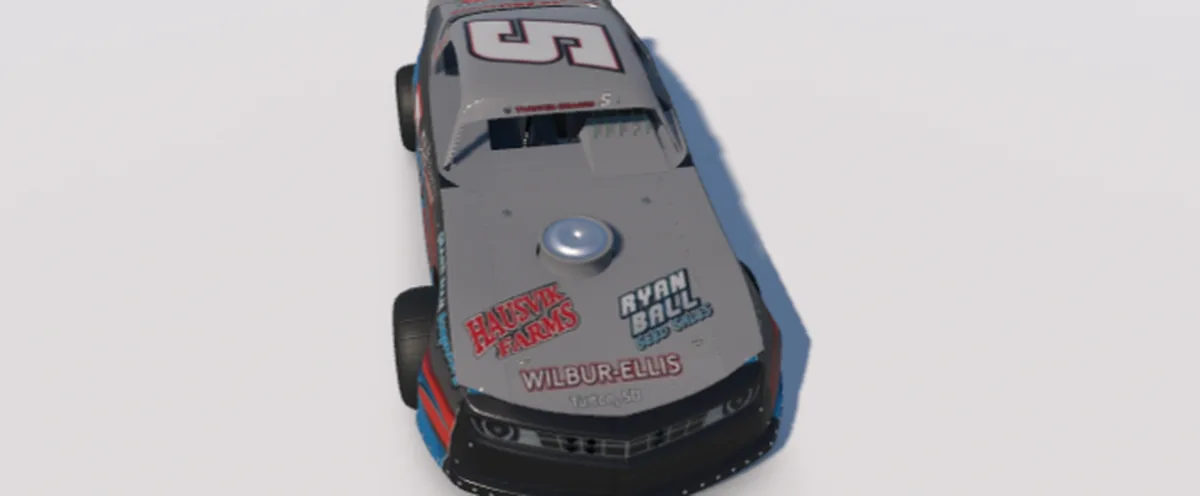
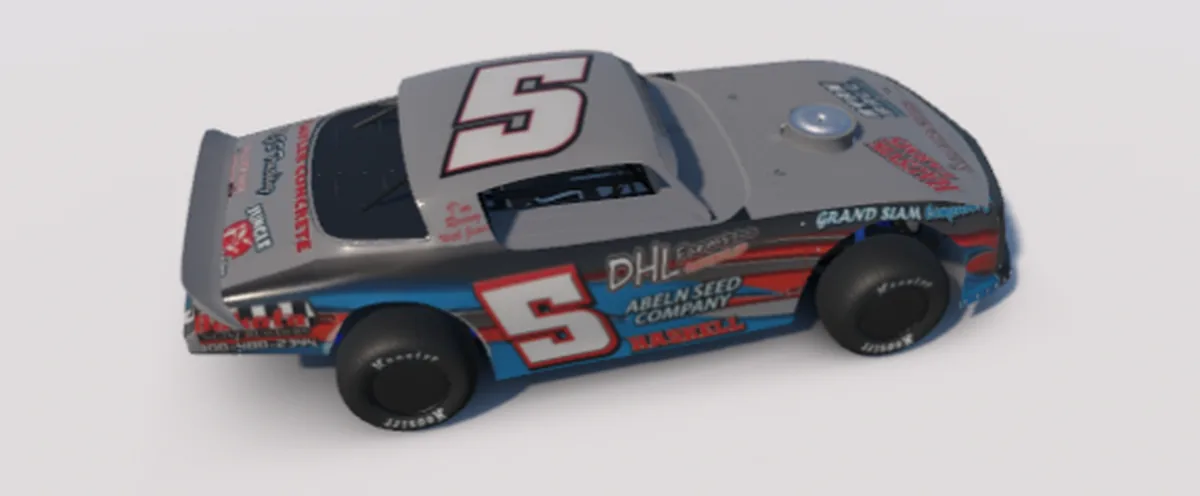
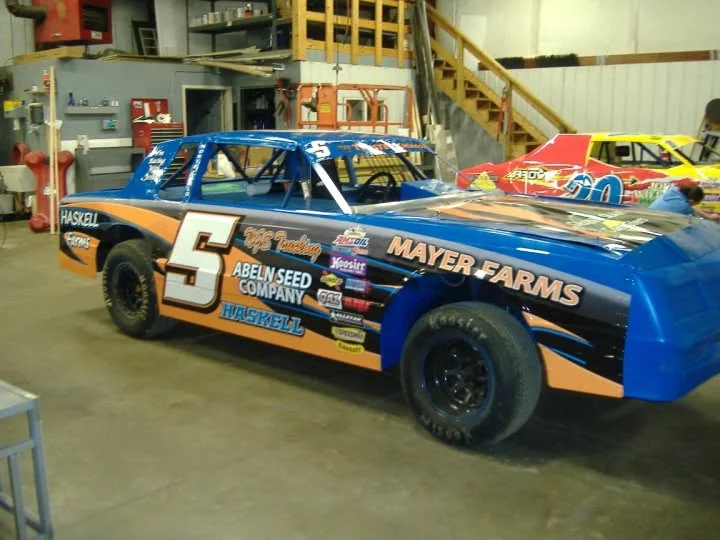
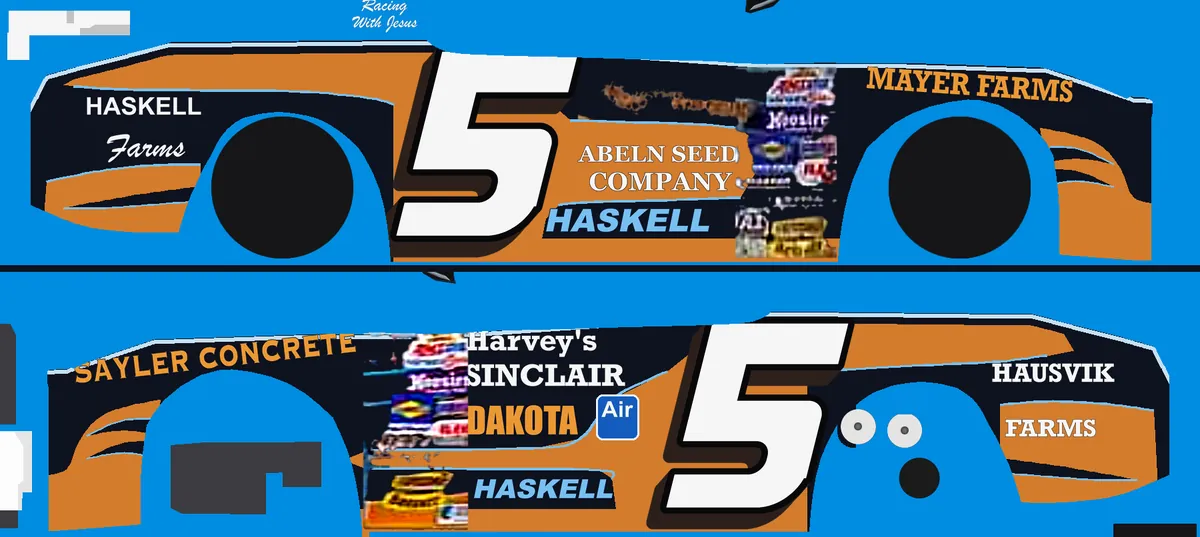
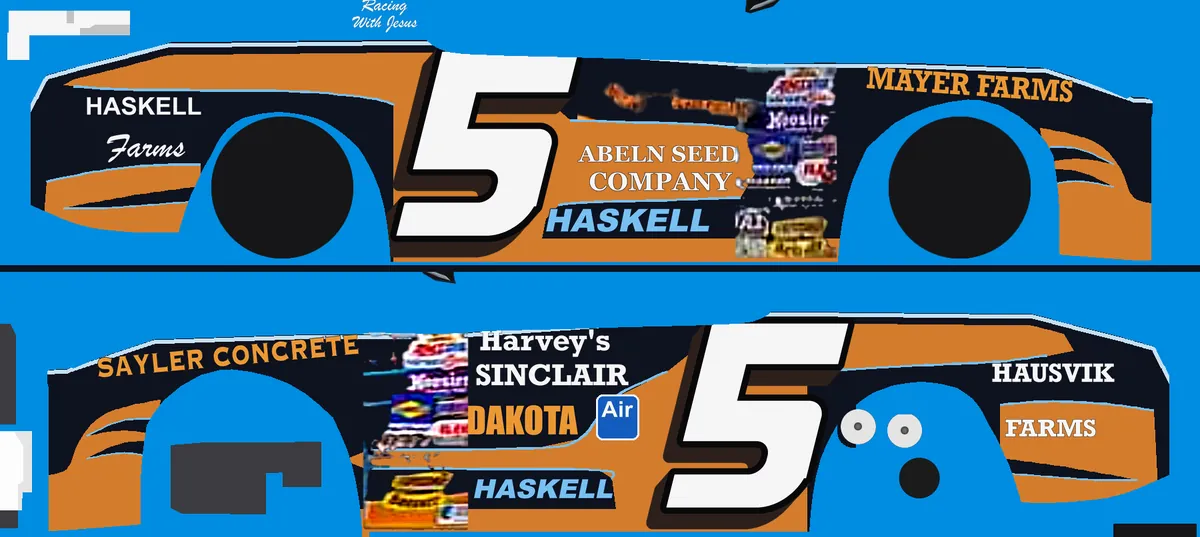
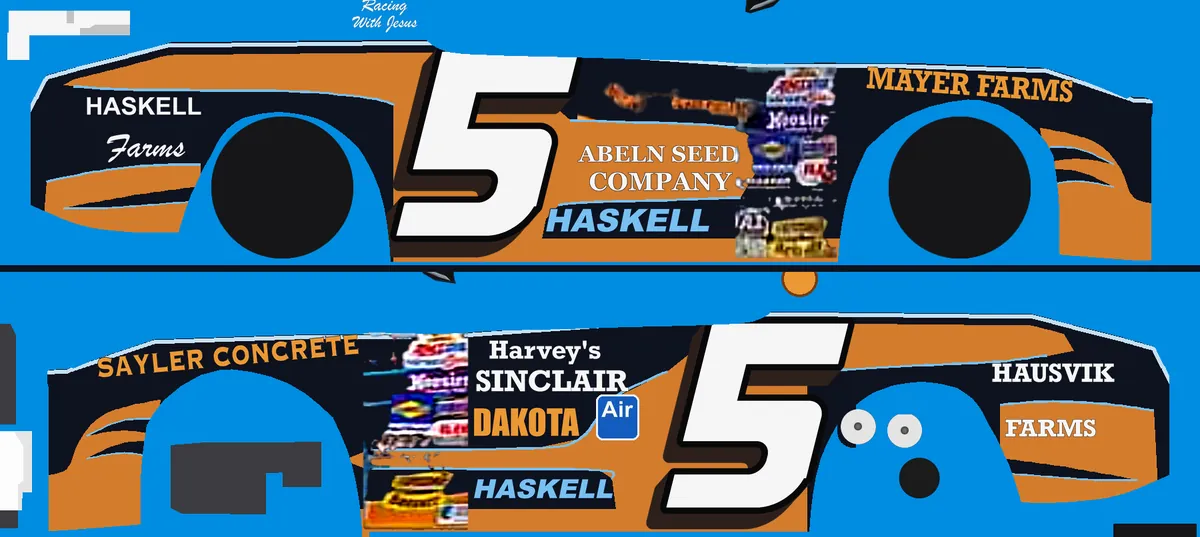
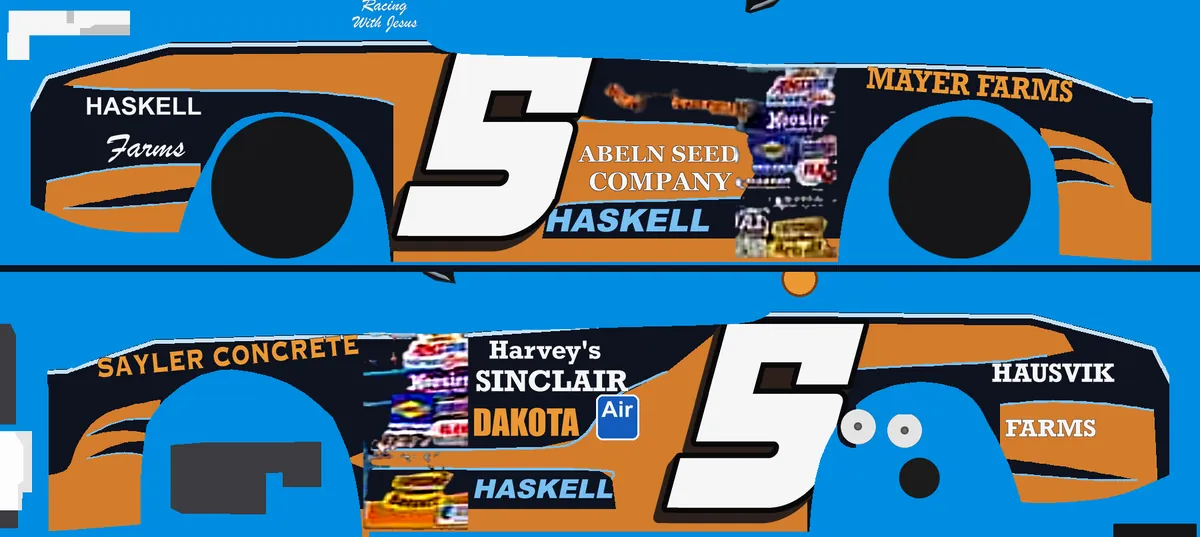
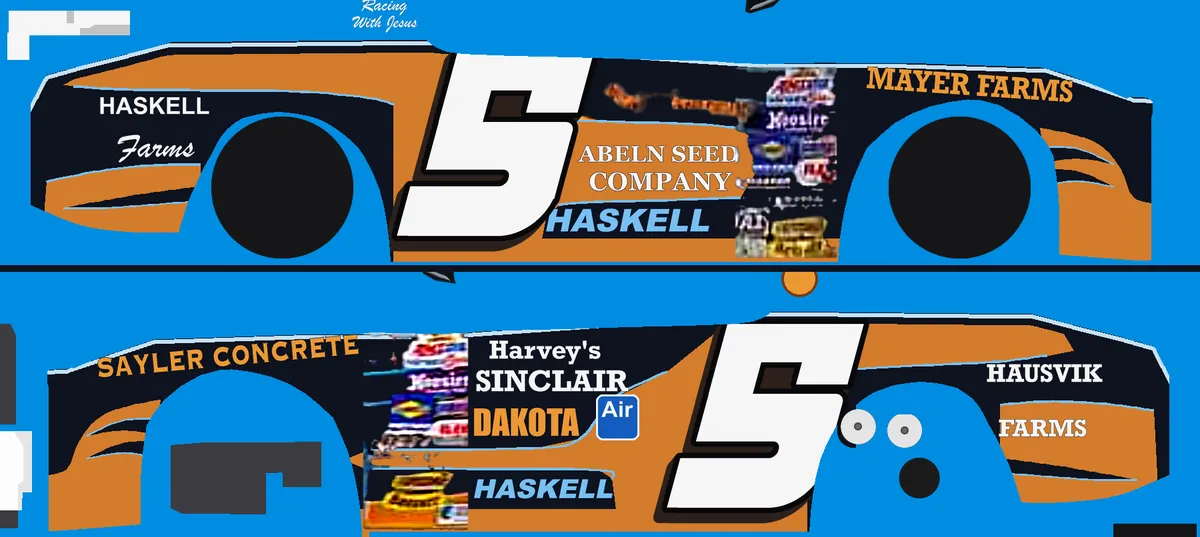
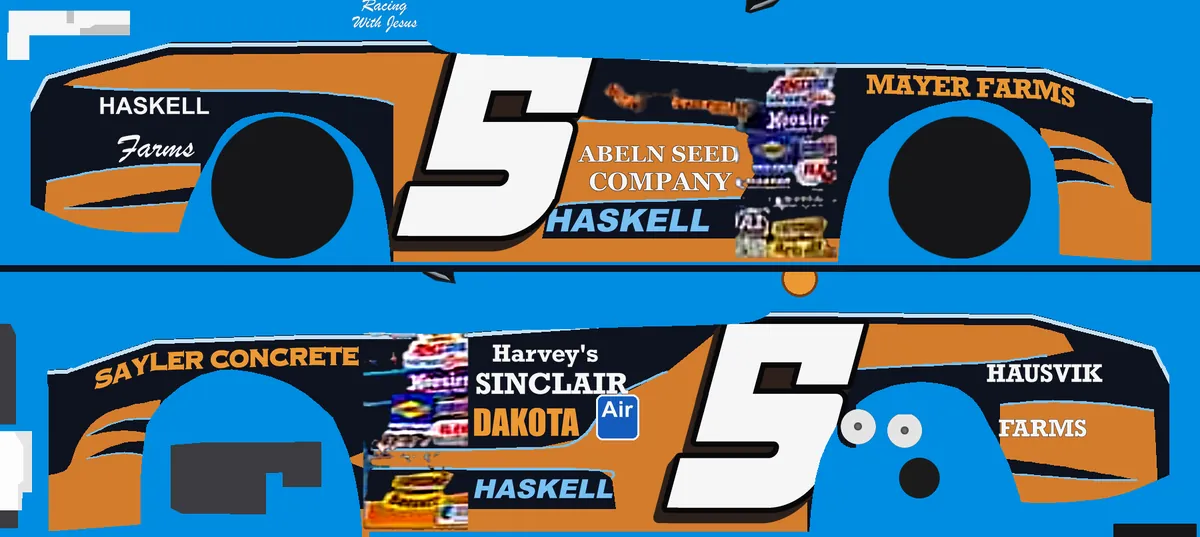
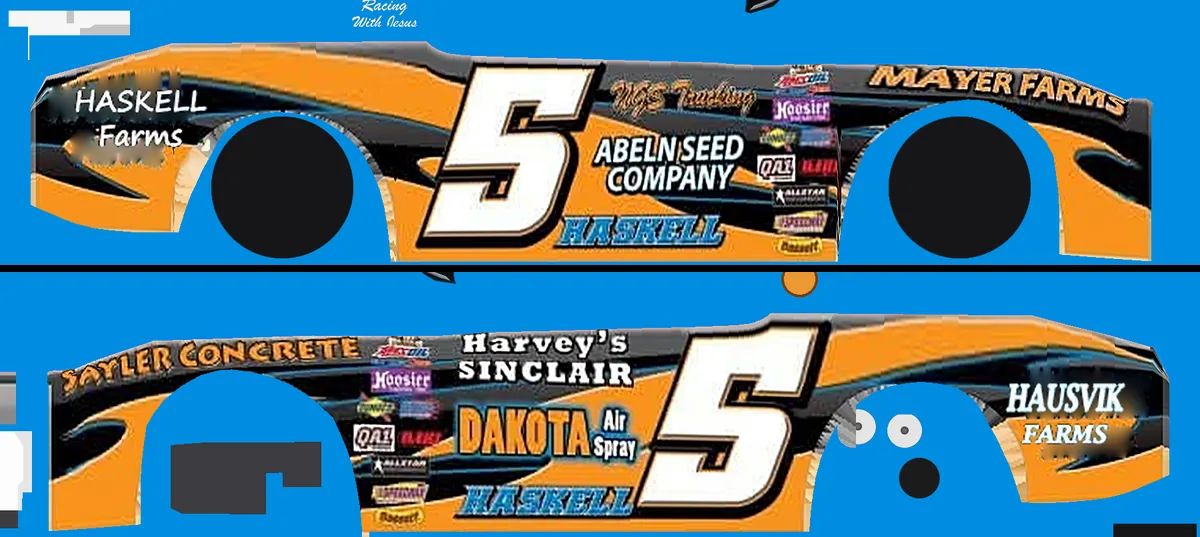
The championship season. This one started from just two photos: the left side from his 2010 thank you card, and the right side in the snow with a roof full of trophies.
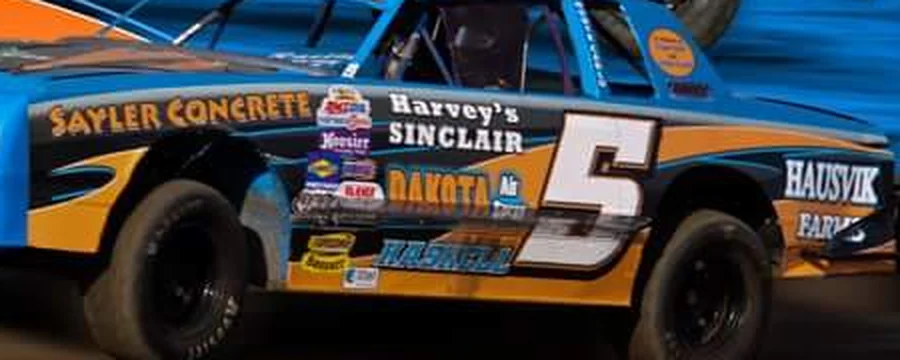
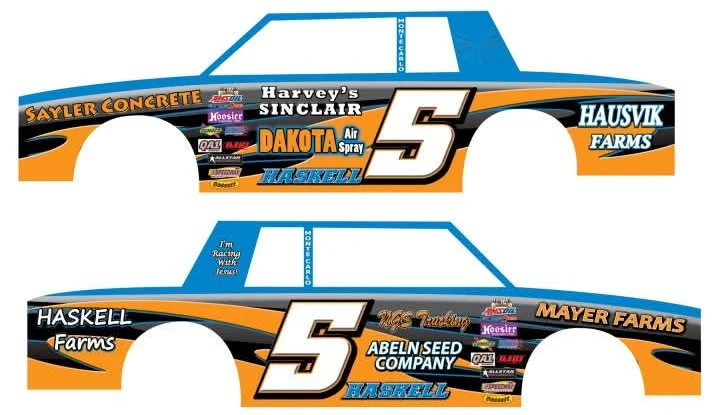
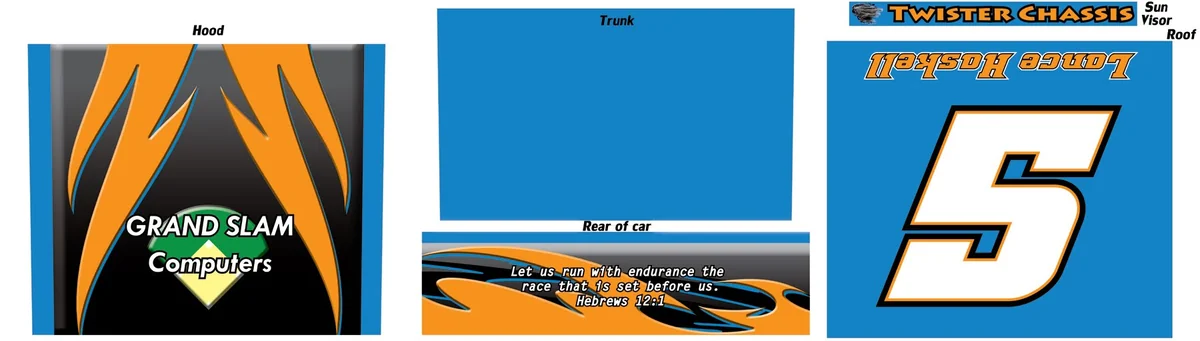
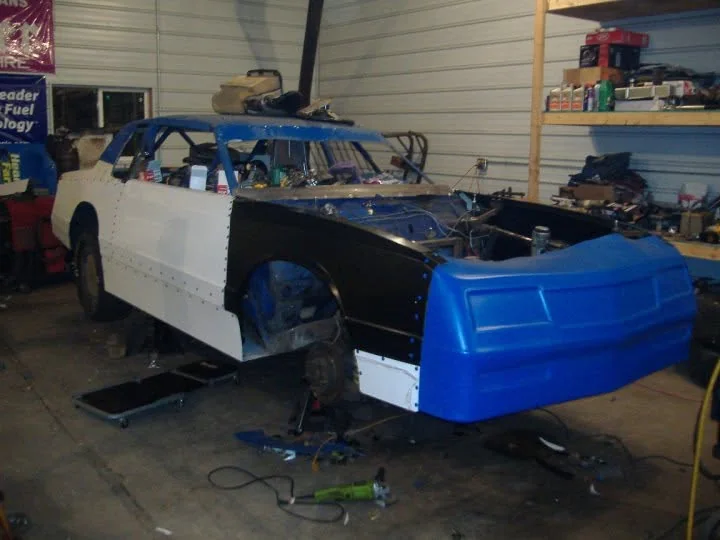
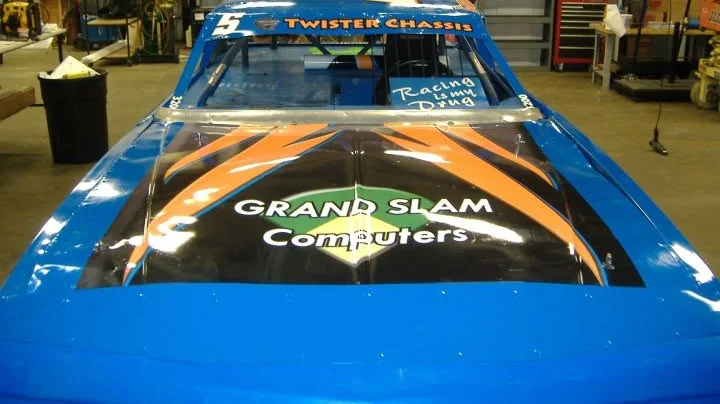
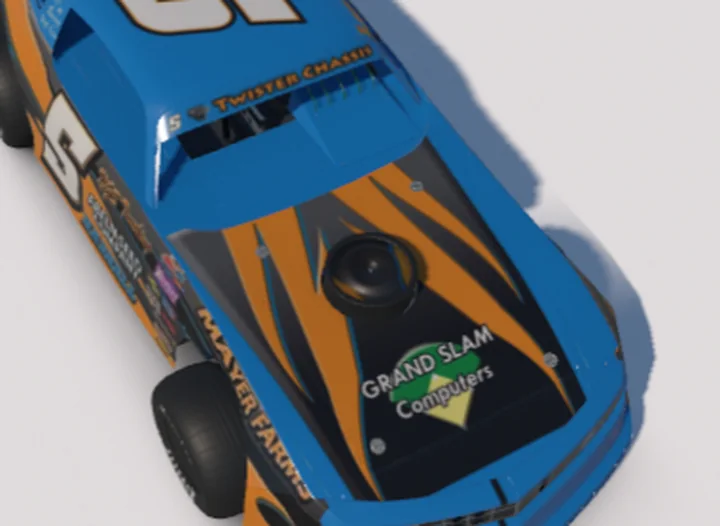
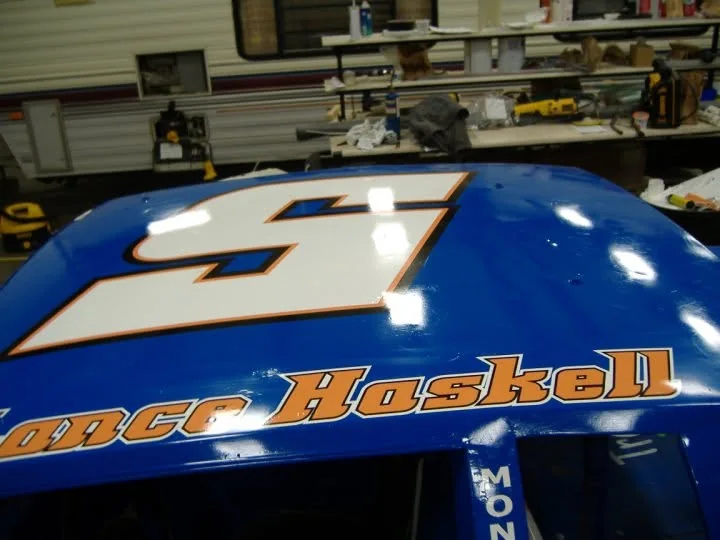
Later Lance found the design files for its sides, then his 2010 photo album, with the car in the shop and its hood, roof and back up close, and then the design file for its top: the hood, trunk, back, sun visor and roof. So the newest version wears his real artwork all the way around.
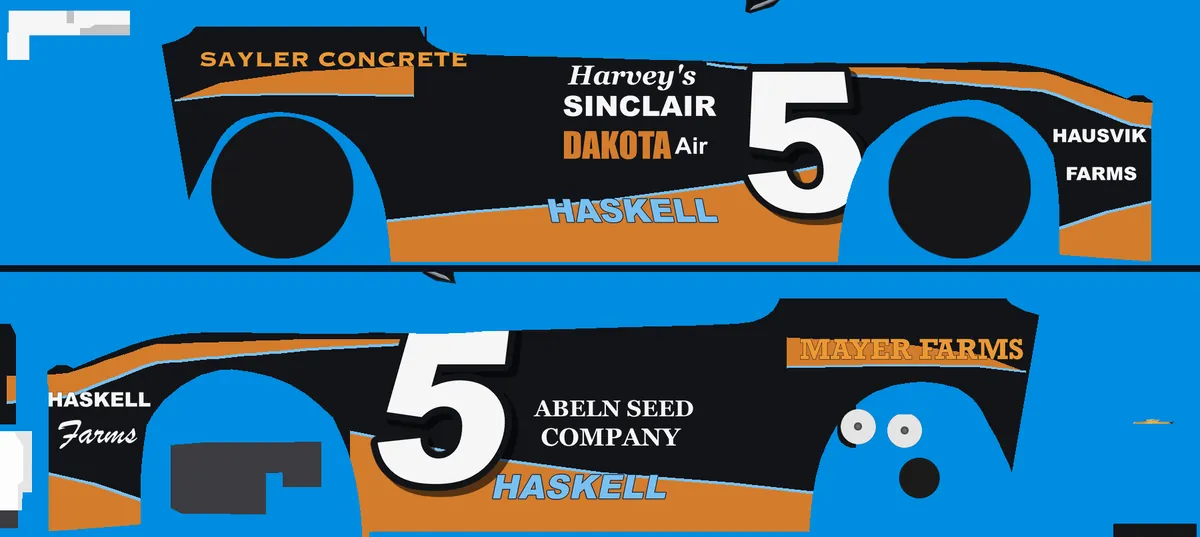
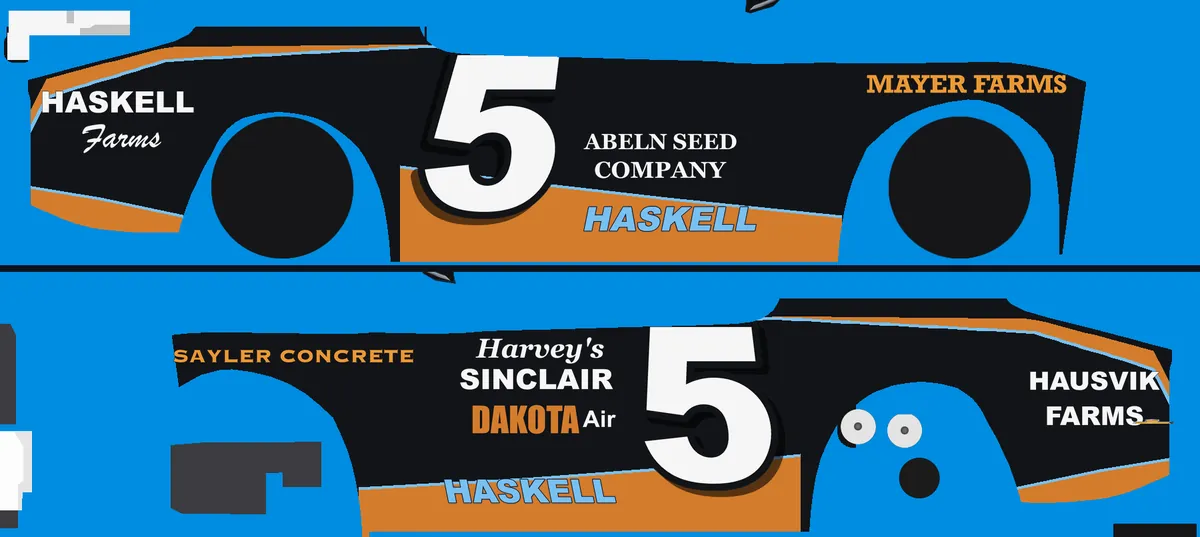
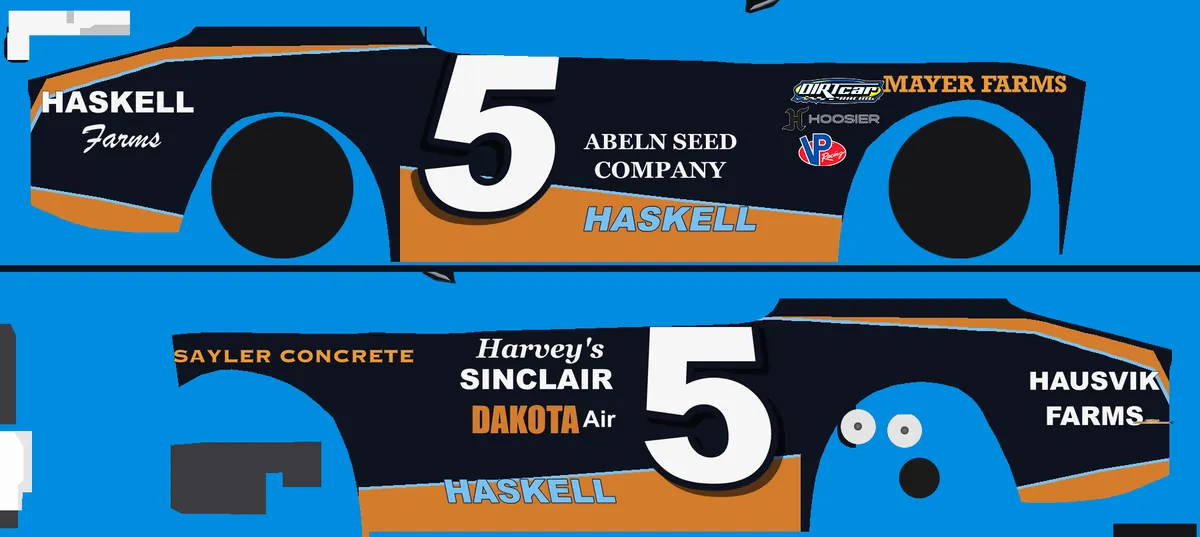
Watch it come together
Every version of the sides, from the first try to the newest. Slide through them, or press play.
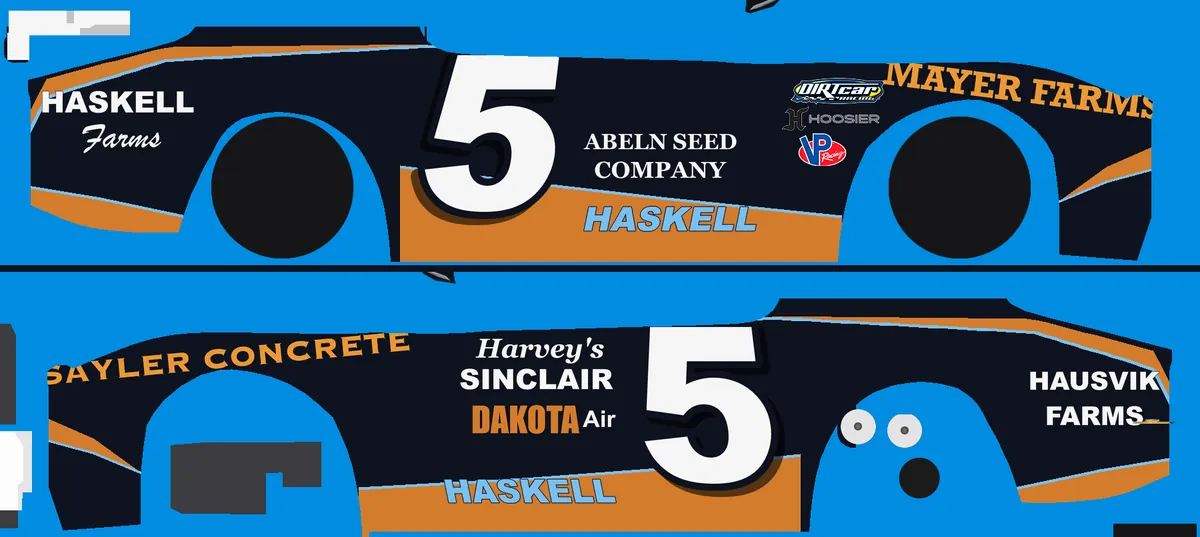
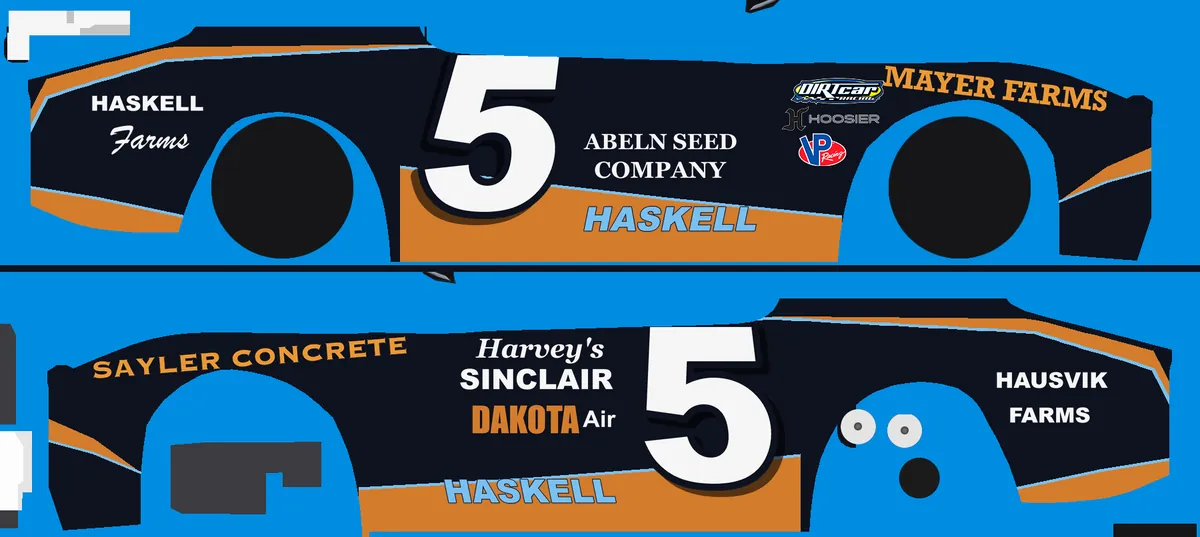
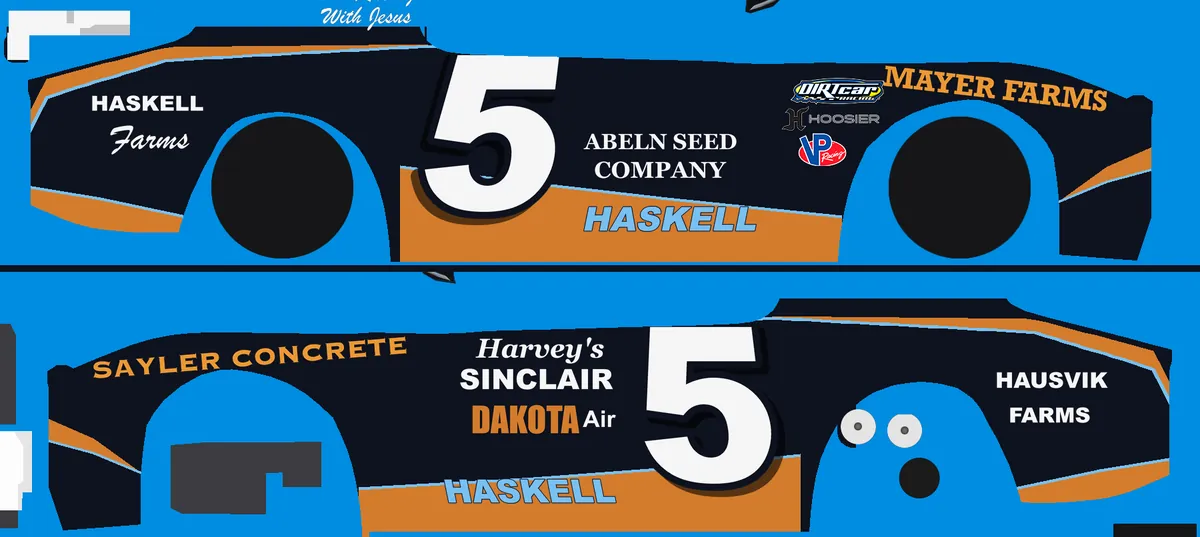
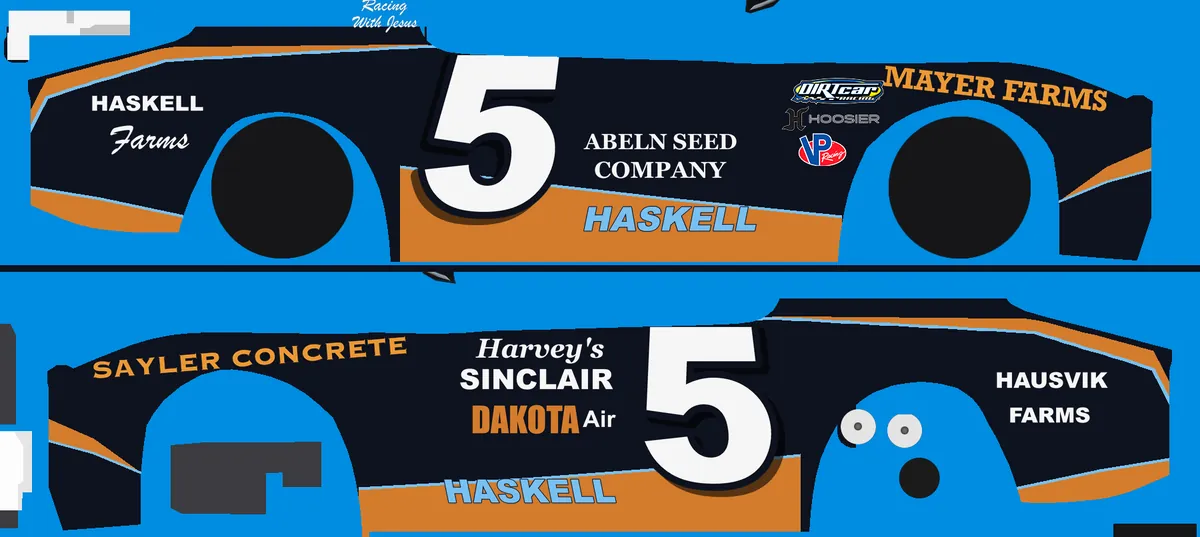
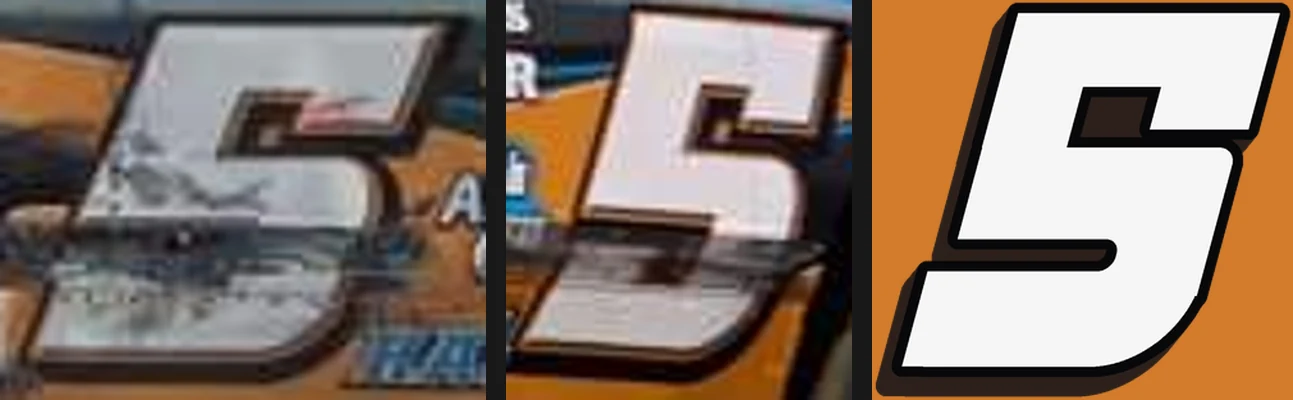
His 5
No font has Lance's 5, so it was measured from the photos: a square notch under the top bar, a hairline slit out to the edge, a narrow slot in the bowl, and a bottom stroke that kicks out past the upright.
Walk around it
The 2010 car with his side files and his top file. Drag it, or use the slider, to walk around it.
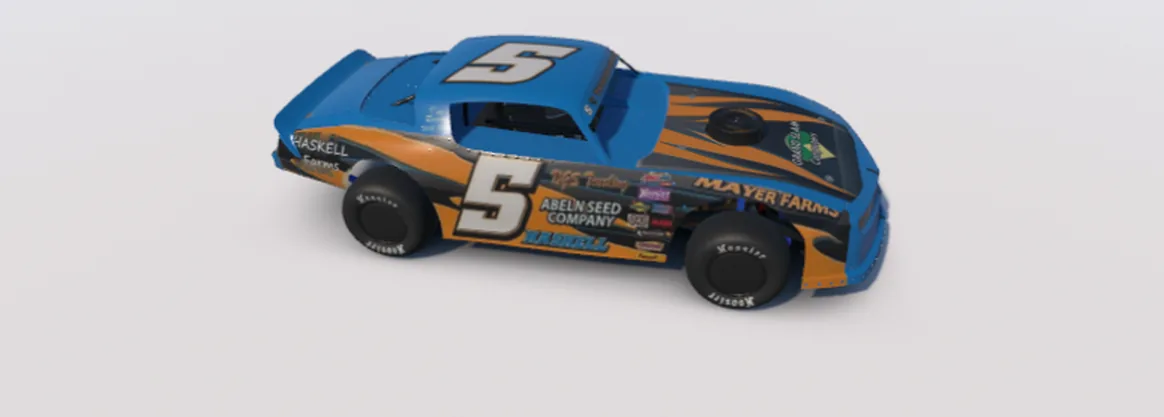
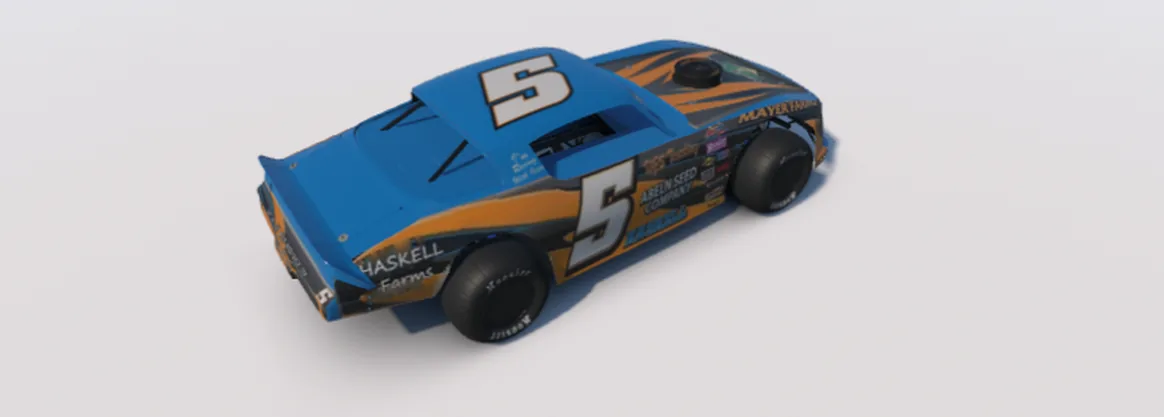
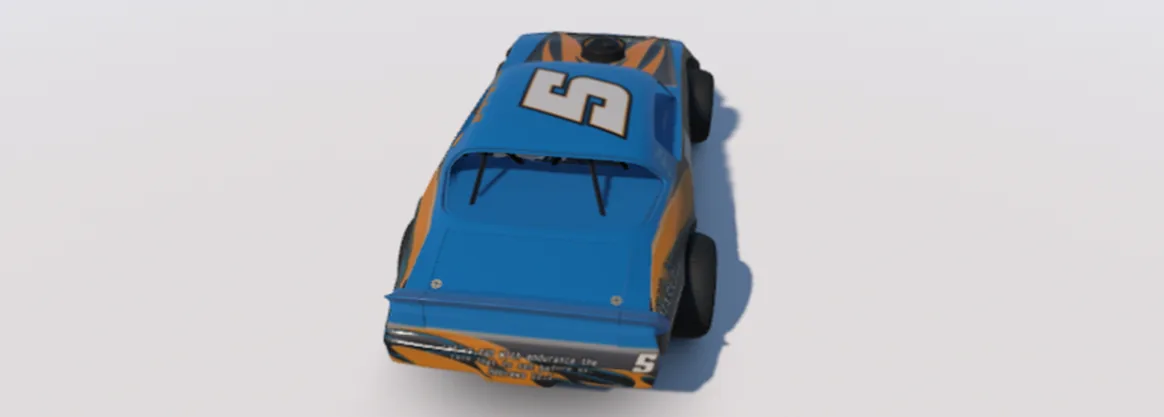
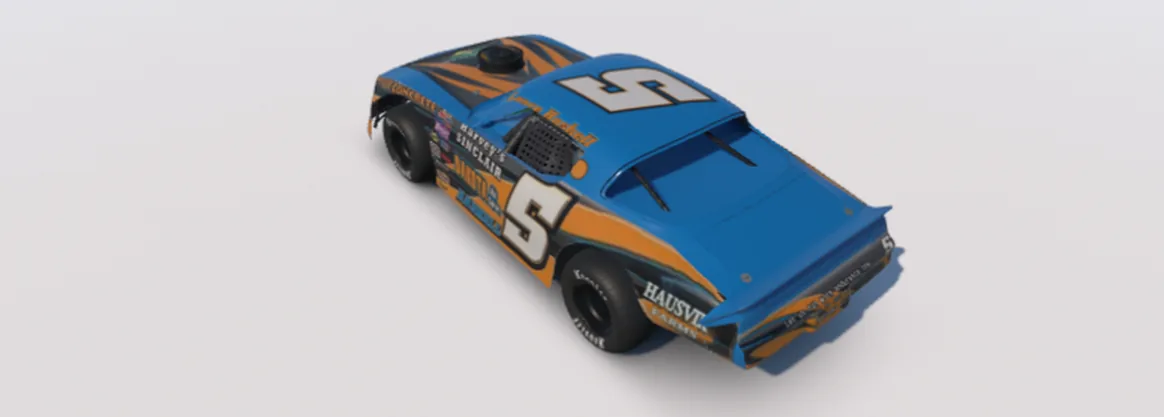
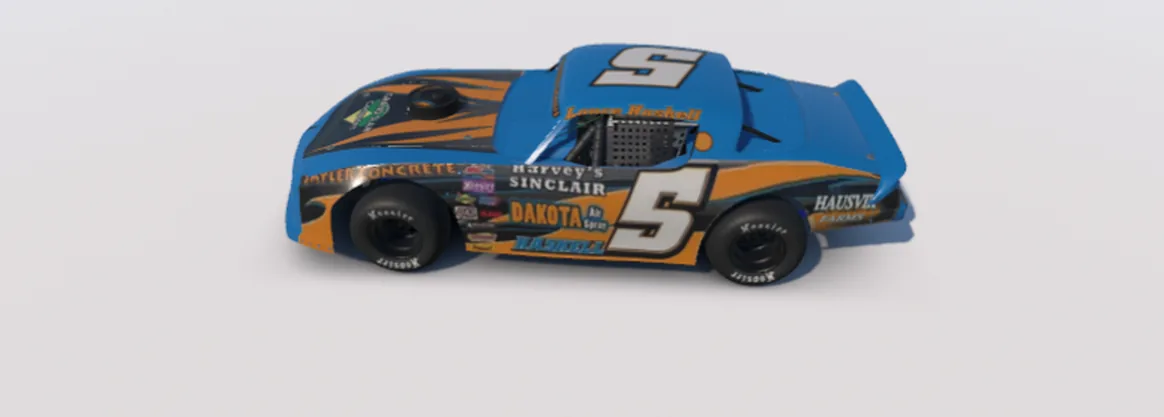
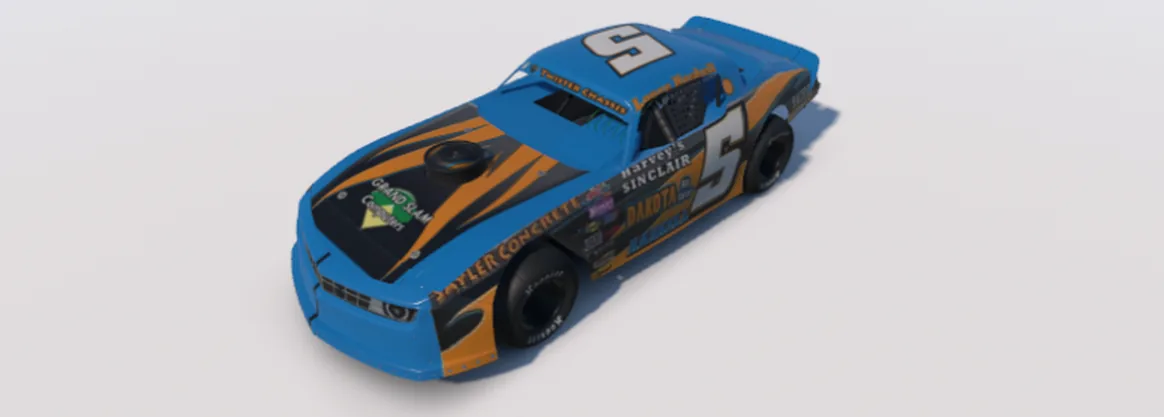

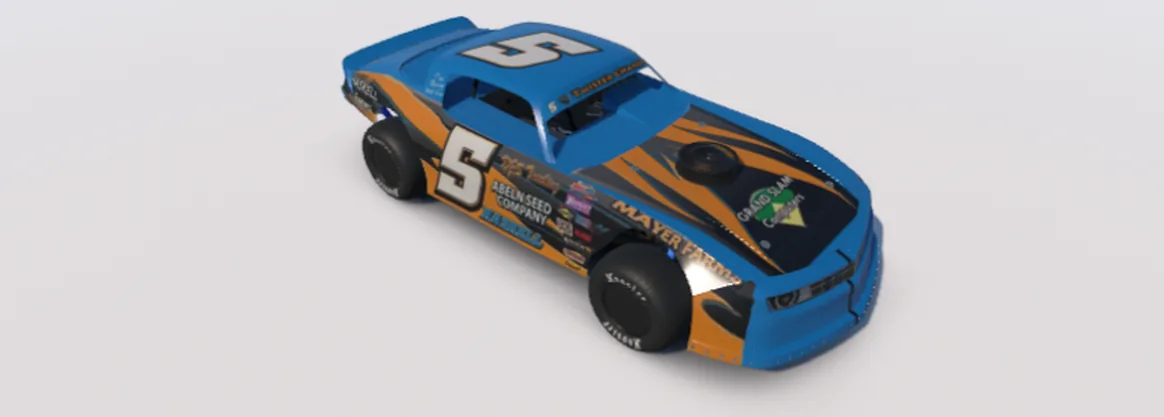
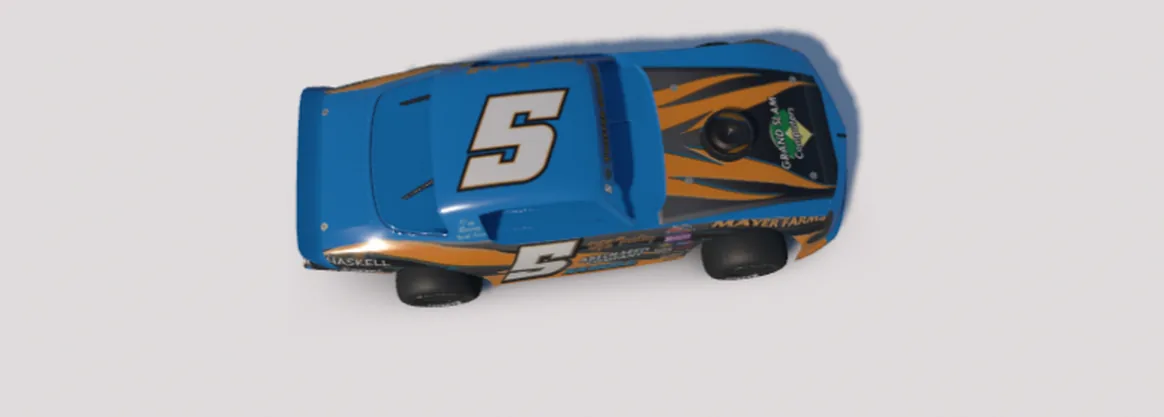 ⟳ Drag to spin
Right side
Then and now: 2010
Part two · the how to
Paint your own car in iRacing
Here is the whole method, step by step, for anyone who wants their own real race car in iRacing, with Lance's cars as the example all the way through. Paint yours in a free picture editor, or let an AI helper do the heavy lifting the way Lance's cars were built (see If you want an AI to help instead).
The short version
A custom iRacing paint is one flat picture of your whole car, 2048 by 2048 pixels, saved as a TGA file with your iRacing customer ID in its name. Put it in iRacing's paint folder, and iRacing wraps it around the 3D car.[1] No coding needed.
- Download iRacing's paint template for your car (Lance's cars are the Dirt Street Stock).
- Open it in a picture editor and paint on it: colors, stripes, your sponsors, your number.
- Save it as
car_<your customer ID>.tgainDocuments\iRacing\paint\dirtstreetstock. - Look at it on the 3D car in iRacing, fix what is off, and save again.
- Optional: use Trading Paints so other drivers see your car when you race online.[2]
What can't match exactly
In iRacing you paint the cars iRacing makes. iRacing's own help page says its content cannot be modded,[3] so there is no way to bring in your own car or reshape one. A design always goes on iRacing's own Dirt Street Stock body, not on Lance's real car, a Chevy Monte Carlo (his 2012 race card says MONTE CARLO on the window post). Even where iRacing offers more than one body, like the Panther C1, Casino M2 and Eagle T3 of its Street Stock, they share one physics model, so a body only changes the look.[4]
A wrap designed for a real car has to give a little:
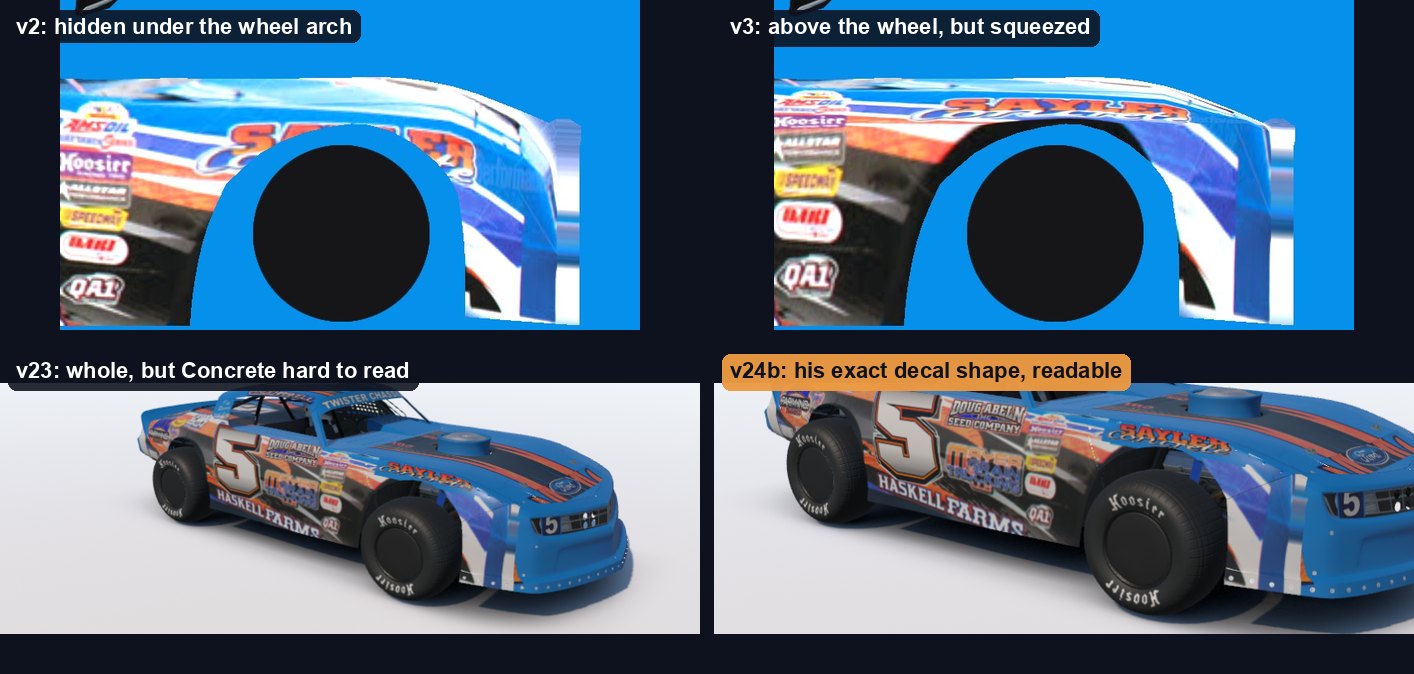
- The front fender is shorter. Above the front wheel, iRacing's fender is about half as tall next to the wheel as on Lance's car. SAYLER Concrete can run as long as on his car but not as tall, so it can never be an exact copy.
- Every panel is a different shape. Logos made for a real car's doors, quarters and hood get fitted to iRacing's panels by eye. They sit where they look right, not to the inch.
- No photo, no exact copy. Lance's 2010 car started from just two photos, so its top and back were a best guess until his photo album and his top file turned up.
What you need
One Windows PC that runs iRacing is enough. Everything else on this list is free except iRacing itself and Photoshop, which you can skip.
| What | What it is for | Cost |
|---|---|---|
| iRacing, with your car in your account (for Lance's cars, the Dirt Street Stock) | Seeing your paint on the 3D car | Your iRacing membership |
| A picture editor that opens PSD files and saves TGA files | Painting the car | Free: Photopea (runs in your web browser)[5] or GIMP[6]. Paid: Photoshop. Trading Paints lists all three for iRacing's templates[7] |
| iRacing's paint template for the car | The flat outline of the car you paint on | Free, from inside iRacing[1] |
| Your photos | Copying where everything goes | Free: every side of the car, shot as straight on as you can |
| Your logo files | Sharp sponsor logos | Free: ask the shop that made your wrap for its design files |
| Your iRacing customer ID | Naming the paint file | Free: in iRacing, click the helmet at the top right, then Profile; the number is at the top[1] |
| A Trading Paints account (optional) | Letting other drivers see your paint online | Free account; some extras need Pro[7] |
Step 1: Get the template
The template is a free Photoshop file of your car laid flat, and iRacing hands it to you inside the app.
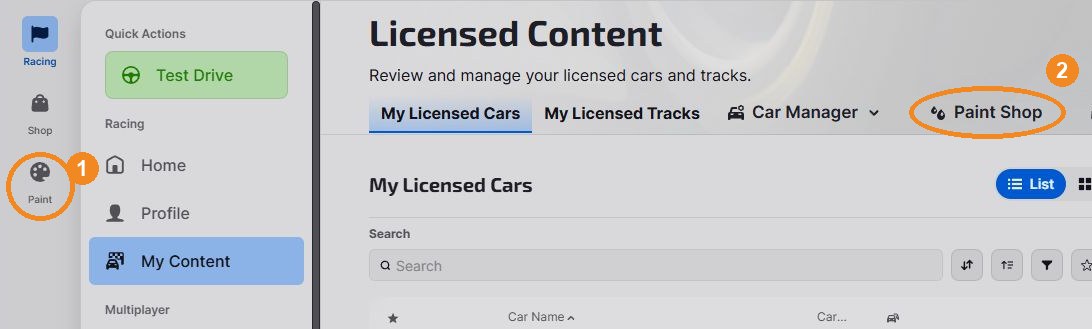
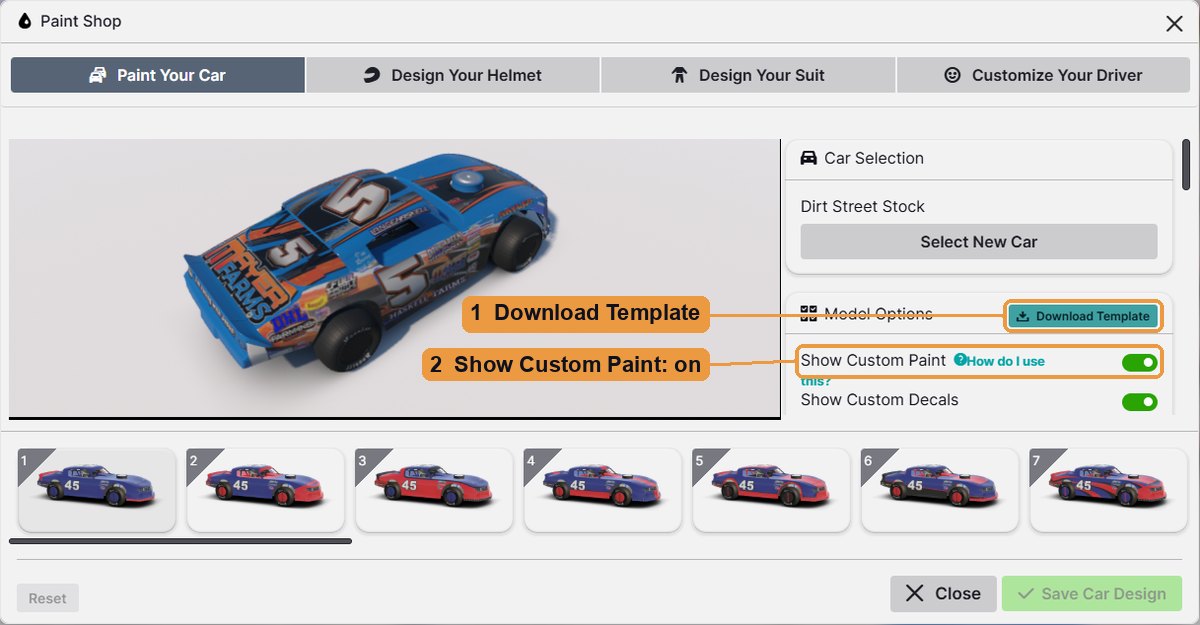
- In the iRacing app, click Paint in the far left column (or open My Content and click its Paint Shop tab). The Paint Shop opens on Paint Your Car. Pick your car under Car Selection (for Lance, the Dirt Street Stock).
- Under Model Options, click Download Template. For Lance's car you get
Dirt Street Stock.psd, 2048 by 2048 pixels. - Open that file in Photopea or GIMP. Photopea: go to photopea.com, click Start using Photopea if it shows a welcome page, then drag the file into the window (or File, then Open). GIMP: File, then Open.
- Save a copy as your working file, for example
mycar.psd(Photopea: File, then Save as PSD; it goes straight to your Downloads folder, so rename it there). Keep painting in this file; the TGA for iRacing gets exported from it at the end.
iRacing's help page gives a second way to the same file: My Content, then Car Manager, then Download Template.[1]
The template comes with layers already in it. These are the ones that matter:
| Layer | What it does | What to do with it |
|---|---|---|
| Turn Off Before Exporting TGA (a folder) | Guides only: Mask shades everything that is not car body, Wire draws the panel edges, Number Blocks shows where iRacing stamps a number, Sponsor Blocks where it adds its own decals | Turn on Wire while you paint. Turn the whole folder off before you save the TGA |
| base (inside Color Change) | The car's base color | Fill it with your car's main color |
| Car Patterns | 24 ready made stripe patterns, hidden at first | Ignore, or use one as a start |
| The parts layers (Rollbars, Cockpit Panels, Mudplugs, Foam Air Breather Cover and others) | Parts of the car that are not body | Leave them, or recolor them |
| Custom Spec Map | Shine and metal effects, a separate advanced file | Skip it for now |
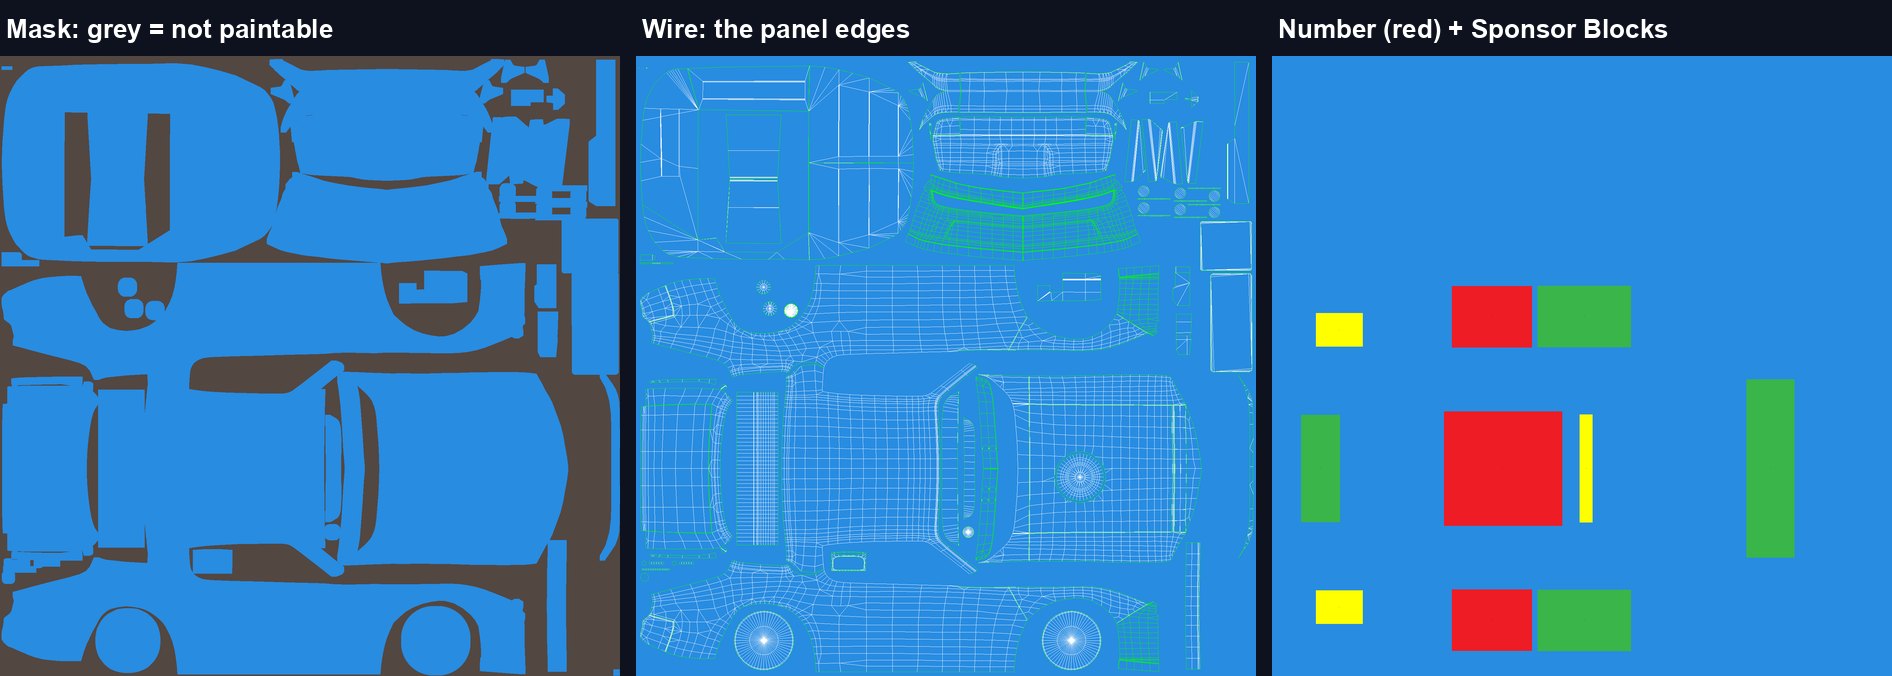
Put every logo, stripe and number on its own new layer above base. Then you can move or fix one thing later without redoing the rest.
Step 2: Learn the map
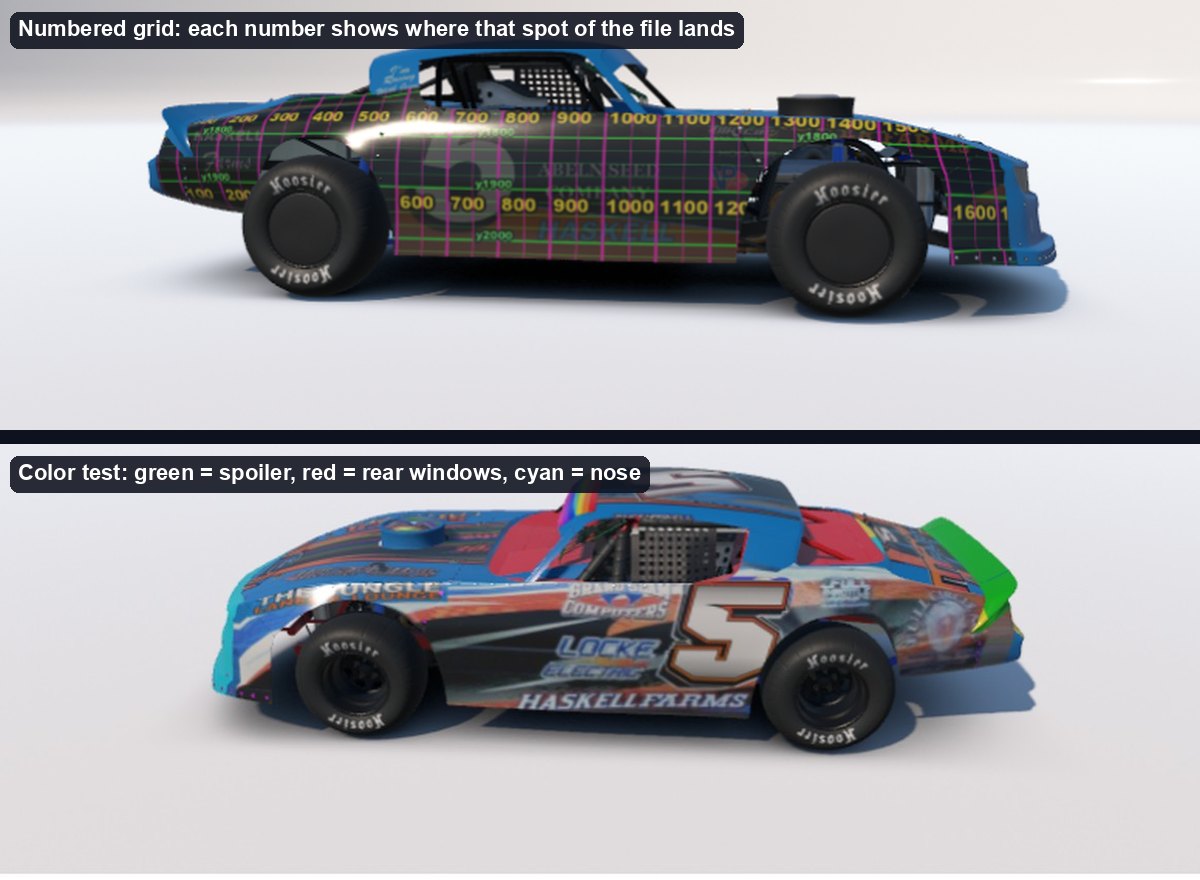
The hardest part is knowing where each spot of the flat picture lands on the car. This is the Dirt Street Stock map measured on the 3D car while building Lance's three cars. Positions are pixels from the left edge of the 2048 wide file; your editor shows them as you move the mouse.
| Where in the flat file | What it is on the car | Watch out |
|---|---|---|
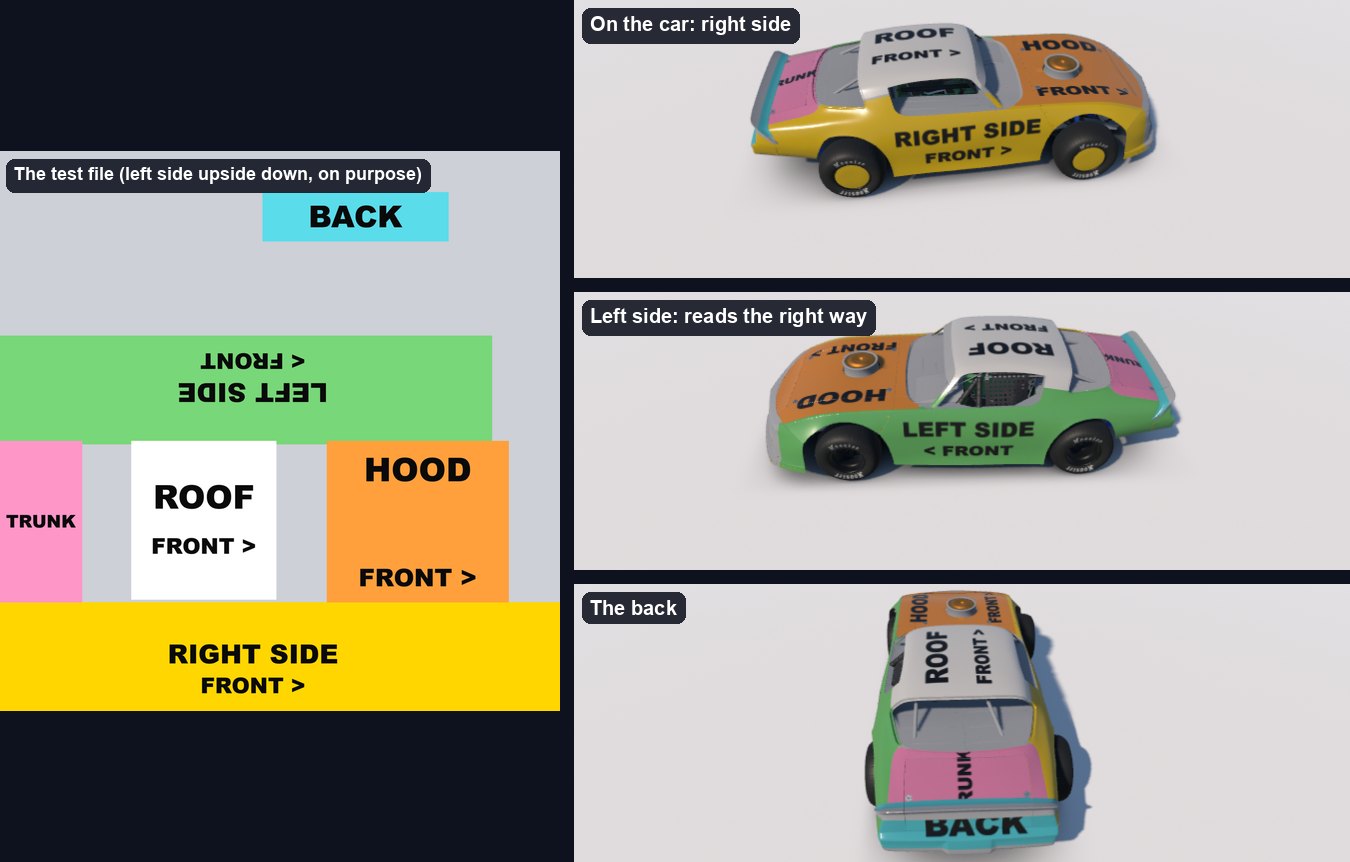
| Bottom strip | The right side, right way up, front of the car at the right end | Front wheel opening about 1262 to 1590 across, rear about 275 to 590 |
| Middle strip | The left side, upside down, front also at the right end | Make your left side artwork right way up first, then rotate it 180 degrees and place it |
| Middle band, left to right | Trunk, roof, the banner along the roof's front edge, the windshield screen, then the hood | The front of the roof is toward the right. A 5 standing upright on the roof reads from the car's right side |
| Top of the file | The back of the car and smaller pieces | Smaller pieces sit up there too. The label test shows which is which |
Here is that label test on the Dirt Street Stock. Every label reads the right way on the car, even the left side, which sits upside down in the file:
Two real tests from Lance's cars, a numbered grid and a color test:
Step 3: Get your logos ready
Sharp logos come from the shop's design files, not from race photos. Lance's 2011 car came out crisp because every panel came from his design files. His 2010 car started from just two photos, so many of its names were typed again in matching fonts, until his side files and his top file turned up.
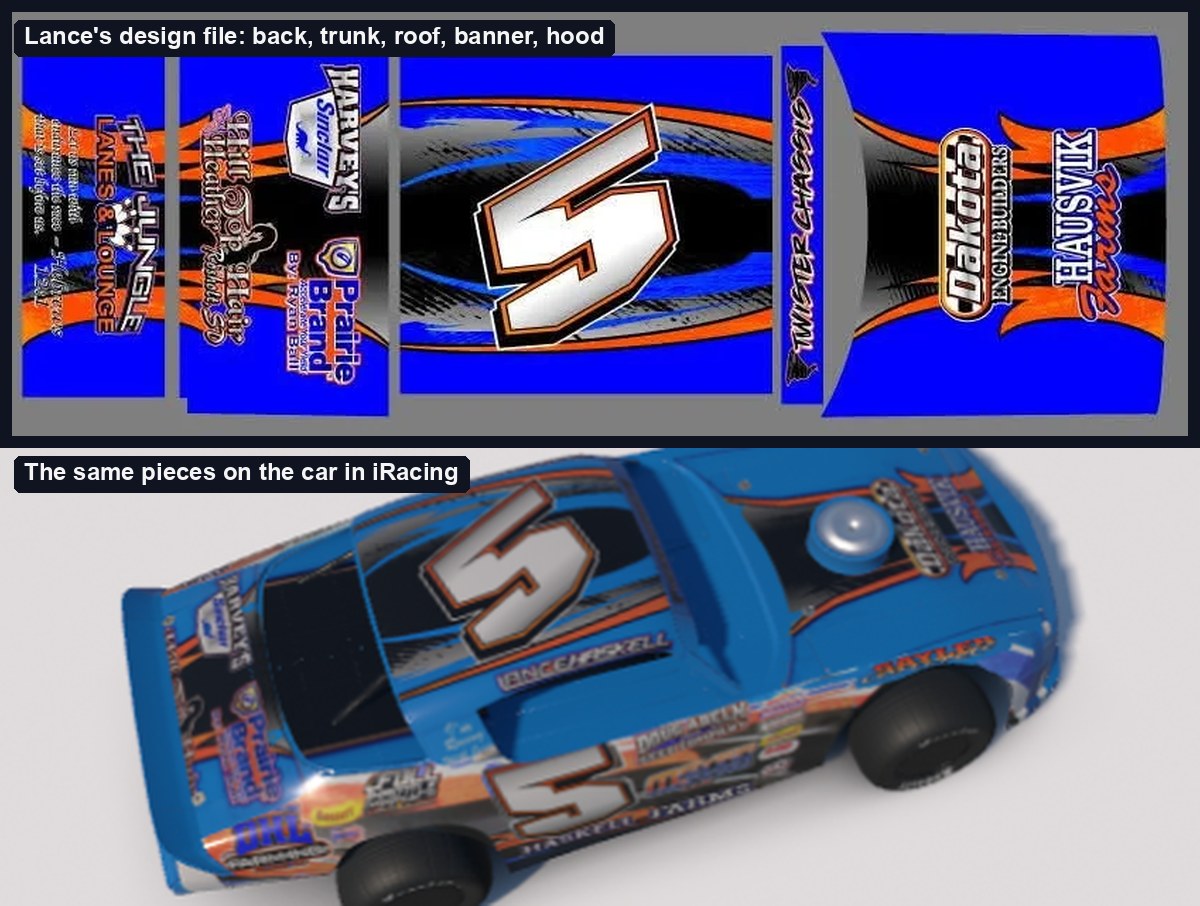
- Ask the wrap shop for the files. Best: PDF, SVG or AI files, which stay sharp at any size. Next best: big PNG files with a see through background.
- No file? Use a photo shot straight on, close up, in daylight. Crop it, then straighten it with the perspective tool (Photopea: Edit, Transform, Perspective; GIMP: Tools, Transform Tools, Perspective[8]).
- Cut the logo off its background. Select the background with the magic wand (GIMP calls it Fuzzy Select[9]) and delete it. In GIMP, add transparency first: Layer, Transparency, Add Alpha Channel.[10] Keep the logo's white or black outline, like the real decal.
- Match the colors. Use the eyedropper on your photo to pick the car's real colors.
- Never blow a small logo up. If it is too small or blurry, type the name again in a font that looks the same.
One thing no font had: Lance's 5. It was drawn from measurements of his photos (see His 5 above).
Step 4: Paint the car
Work from your photos, one panel at a time, with the Wire layer on so you can see the panel edges.
- Base color. Fill the base layer with your car's main color. Photopea: click base in the Layers panel, click the upper of the two color squares at the bottom of the tools, pick your color and click OK, then Edit, Fill, OK. GIMP: click base, set the foreground color, then Edit, Fill with FG Color.[25]
- Stripes and big shapes. Add the color bands (on Lance's 2010 car: black and orange under the blue) on new layers. Run them along the body lines the Wire layer shows.
- Your number. Put it on the doors and the roof. The red Number Blocks boxes show where iRacing would stamp its own number, a good guide for size.
- Sponsors. Place each logo where it sits on your real car, checking your photo side by side. Left side logos go in upside down (Step 2).
- Roof, hood and trunk. Same idea, using your design files and any photo from above.
Rules that keep it looking right on the car:
- Make side names a little wider than looks right flat. The car's sides look narrower in 3D than in the file, so names drawn to the photo's shape come out squeezed.
- Mind the front fender. On this iRacing car, the fender above the front wheel is only about 56 pixels tall, about half as tall next to the wheel as on Lance's real car. A fender name can be as long as on the real car, but not as tall.
- Stay off the corners. The sides wrap around the car's corners: behind about 135 across at the back and past about 1665 at the front. Anything there disappears around the bend.
- Leave the guide folder alone until saving. Turn off Turn Off Before Exporting TGA only when you save the TGA.
Step 5: Save the paint file
iRacing wants a 24 bit TGA with RLE compression,[1][11] at 2048 by 2048 like the template (iRacing also takes 1024 by 1024),[1] named with your customer ID and placed in the car's paint folder.[1]
- Turn off the Turn Off Before Exporting TGA folder. Leave Custom Spec Map off too.
- Export a TGA:
- Photopea: File, Export as, More, then TGA. In the box that opens, type
car_<your customer ID>in Name and click Save. The file goes to your Downloads folder. In our test it came out as the 24 bit TGA with RLE compression that iRacing wants. - GIMP: Image, Flatten Image. It merges everything into one layer with no alpha channel,[12] and a TGA with no alpha channel is the 24 bit kind iRacing wants.[11] Then File, Export As, with a name ending in .tga.[13] If it offers RLE compression, turn it on.[1] Undo the flatten afterward so your layers come back.
- Any other editor, Photoshop included: export a TGA at 24 bits with RLE compression on.[1][11]
- Photopea: File, Export as, More, then TGA. In the box that opens, type
- Name it
car_<your customer ID>.tga, for examplecar_123456.tga.[1] - Put it in
Documents\iRacing\paint\dirtstreetstock. iRacing makes that folder the first time you run the car in a test or race session.[1] On a PC that keeps Documents in OneDrive, it is underOneDrive\Documents.
| File name | When to use it |
|---|---|
car_<ID>.tga | The normal one. iRacing stamps its own car number on top[1] |
car_num_<ID>.tga | Same picture, when you painted your own number and want iRacing's number off[1]. Racing online with it through Trading Paints takes their Pro plan[14] |
Step 6: Check it on the car
The Paint Shop shows your file on the 3D car, so you can check every side without driving.
- Open the Paint Shop (click Paint in the far left column), pick your car, and make sure Show Custom Paint is on under Model Options. This 3D view inside iRacing shows your work in progress.[16]
- Drag the car to spin it, and scroll to zoom. Look from every side and from above, next to your photos.
- Fix the file, export the TGA again with the same name, and look again. The Paint Shop picks up the new file by itself; if the car goes blank, spin it a little.
- Added or removed a
car_num_file? Close the Paint Shop and open it again so it notices. Until then its Show Custom Decals switch can stay grayed out. - In a Test Drive session, Ctrl+R reloads your paint (it does not reload while you sit in the pit stall).[17]
- Save each round as a new working file:
mycar01.psd,mycar02.psd, and so on. Lance's 2012 car took 27 rounds.
This is what all those rounds look like: Watch it come together shows every version of Lance's 2010 car, and Walk around it shows that car from every side.
Step 7: Let other drivers see it
Your paint file lives on your PC, so only you see it. Other drivers see the plain car unless they have your file,[1] and Trading Paints is how they get it. This step is optional.
- Sign in at tradingpaints.com with your iRacing login.[16]
- Upload your TGA for your car.[7]
- Install the Trading Paints Downloader on your PC and leave it running while you race. It loads the other drivers' paints into iRacing, and drivers who run it see yours.[2]
The free plan covers this.[7] A custom number paint (car_num_) and their Paint Builder take the Pro plan.[7][14]
Lessons learned the hard way
Each of these cost real time on Lance's cars.
- Test before you paint. Version 1 of the 2010 car had each side wearing the other side's sponsors. A five minute test paint (Step 2) catches that.
- Design files beat photos. Names copied from photos come out soft. The whole 2011 car came from Lance's design files, and it came out crisp.
- The front fender is small. SAYLER Concrete took nine versions to fit the right front fender and still read clearly.
- Check from above, not just the sides. The roof 5 and the hood need the same check.
- Save every version. Going back is easy when the old file is still there.
If you want an AI to help instead
Lance's three cars were built with an AI assistant, Claude Code from Anthropic, running in a terminal: the plain text window where you tell a computer what to do. Claude Code ran on a Mac and reached the Windows PC with iRacing over the home network (SSH), so it could put each new paint file on that PC by itself.
What the AI did on its own, every round:
- Wrote and ran small Python programs that build the paint file: testing the map, cutting the logos, bending the photos flat, placing everything, saving the TGA.
- Copied the new file into iRacing's paint folder on the PC.
- Spun the car in iRacing's Paint Shop and took its own screenshots, from every side and from above.
- Brought the screenshots back, set them next to Lance's photos, and fixed its programs wherever the car did not match.
- Went around again.
That loop ran 27 times for the 2012 car and 17 times for the 2010 car. The 2011 car took two, because it came from Lance's design files and by then the map of the car was already measured. The human part was looking at each version and saying what was off.
Talk instead of typing. In the terminal, type /voice once. From then on, hold the Space bar and talk. Let go, and your words appear in the message box; press Enter to send.[18] Tommy directs it this way: hold Space, say what looks wrong, let go. It is far easier than typing. Voice works on Mac, Windows and Linux. It needs you signed in with a Claude.ai account, and your recording goes to Anthropic's servers to be turned into text.[18]
Getting it on a Windows PC. Claude Code needs a paid Claude plan, Pro or higher; the free plan does not include it.[19] Open PowerShell, paste this line, and press Enter:[19]
irm https://claude.ai/install.ps1 | iex
Then go to your project folder in the terminal (for example cd Documents\mycar) and type claude. The first time, it has you sign in through your web browser.[19] The programs it writes run on Python, which is free.[20]
Rather not use a terminal? The Claude desktop app has Claude Code in its Code tab, on the same paid plans.[21] Install the app, sign in, and click Code. In the row under the prompt box, click the environment selector and pick the top entry under Local. Then click the folder control beside it, pick Open folder…, and choose your project folder.[21] The hold Space voice feature above is documented for the terminal.[18]
Download CLAUDE.md
- How to start: put your photos, your logo files, the template and CLAUDE.md in one folder, start Claude Code there, and say: Read CLAUDE.md, then help me paint my Dirt Street Stock for iRacing to match these photos, and save it as car_<my customer ID>.tga in my iRacing paint folder.
- Your part: look at every version in the Paint Shop and say exactly what is off, like “the name on the right front fender is cut off.” That is what made Lance's cars match.
- Show it, too: take a screenshot of the Paint Shop and paste it into Claude Code (Alt+V on Windows), or drag the picture file in, so it sees what you see.[24]
On set, my job is to make a character feel real, down to the small details. This project scratched the same itch: every sponsor, every stripe, every 5. And it only came together because Lance kept searching for old photos and design files and sending them my way. Thank you, Lance.
Sources
Each number in brackets above points to the page below that backs that fact. Every one is the maker's own page: iRacing, Trading Paints, Anthropic (the maker of Claude), Photopea, GIMP and Python. Everything without a number, like the map of the car and the lessons, comes from building Lance's three cars, and the Photopea steps were run in Photopea on Nov 18 2026, with the TGA it saved checked on the car in iRacing.
- iRacing Support. How do I custom paint my iRacing cars? support.iracing.com. Read Nov 18 2026.
- Trading Paints Help. What is Trading Paints Downloader and why do I need to use it? help.tradingpaints.com. Read Nov 18 2026.
- iRacing Support. Is there any content that we're allowed to mod? support.iracing.com. Read Nov 18 2026.
- iRacing. iRacing 101: New Street Stocks (June 6, 2024) www.iracing.com. Read Nov 18 2026.
- Photopea. Free Online Photo Editor (home page) www.photopea.com. Read Nov 18 2026.
- GIMP. GNU Image Manipulation Program (home page) www.gimp.org. Read Nov 18 2026.
- Trading Paints. Pro: compare the features (free and Pro) www.tradingpaints.com. Read Nov 18 2026.
- GIMP Documentation 3.0. Perspective docs.gimp.org. Read Nov 18 2026.
- GIMP Documentation 3.0. Fuzzy Selection (Magic wand) docs.gimp.org. Read Nov 18 2026.
- GIMP Documentation 3.0. Add Alpha Channel docs.gimp.org. Read Nov 18 2026.
- Trading Paints Help. What file formats are accepted? help.tradingpaints.com. Read Nov 18 2026.
- GIMP Documentation 3.0. Flatten Image docs.gimp.org. Read Nov 18 2026.
- GIMP Documentation 3.0. Export As docs.gimp.org. Read Nov 18 2026.
- Trading Paints Help. What is a Custom Number paint and how do they work? help.tradingpaints.com. Read Nov 18 2026.
- Trading Paints Help. Troubleshooting all black custom paints help.tradingpaints.com. Read Nov 18 2026.
- Trading Paints. Painting Templates www.tradingpaints.com. Read Nov 18 2026.
- Trading Paints Help. How can I see a paint I am creating on a car? help.tradingpaints.com. Read Nov 18 2026.
- Anthropic, Claude Code Docs. Voice dictation code.claude.com. Read Nov 18 2026.
- Anthropic, Claude Code Docs. Advanced setup code.claude.com. Read Nov 18 2026.
- Python Software Foundation. About Python www.python.org. Read Nov 18 2026.
- Anthropic, Claude Code Docs. Get started with the desktop app code.claude.com. Read Nov 18 2026.
- Anthropic, Claude Code Docs. How Claude remembers your project code.claude.com. Read Nov 18 2026.
- Anthropic, Claude Code Docs. Desktop application (Shared configuration) code.claude.com. Read Nov 18 2026.
- Anthropic, Claude Code Docs. Common workflows (Work with images) code.claude.com. Read Nov 18 2026.
- GIMP Documentation 3.0. Fill with FG Color docs.gimp.org. Read Nov 18 2026.